Friday, 24 March 2017

Weblogic cxf logging services

When you face the below logs in web logic console and the console stopped unexpectedly or hangs or stepped unexpectedly , then you have to follow the below steps for resolving it.

Mar 24, 2017 6:44:55 PM org.apache.cxf.services.RecordStoreService.RecordStorePort.RecordStore
INFO: Outbound Message
---------------------------
ID: 1
Address: http://localhost:8500/ATGen-dimvals/
Encoding: UTF-8
Content-Type: text/xml
Headers: {Accept=[application/fastinfoset, */*], Accept-Encoding=[gzip;q=1.0, identity; q=0.5, *;q=0], SOAPAction=[""]}
Payload: <soap:Envelope xmlns:soap="http://schemas.xmlsoap.org/soap/envelope/"><soap:Body><startTransaction xmlns="http://recordstore.itl.endeca.com/" xmlns:ns2="http://record.itl.endeca.com/"><transactionType>READ_WR
--------------------------------------
Mar 24, 2017 6:44:55 PM org.apache.cxf.services.RecordStoreService.RecordStorePort.RecordStore
INFO: Inbound Message
----------------------------
ID: 1
Response-Code: 200
Encoding: ISO-8859-1
Content-Type: application/fastinfoset
Headers: {Content-Length=[196], content-type=[application/fastinfoset], Date=[Fri, 24 Mar 2017 13:14:55 GMT], Server=[Jetty(6.1.26)]}
Payload: α ☺ 8╧♥soap(http://schemas.xmlsoap.org/soap/envelope/≡???Envelope???♥Body8╧☻ns2∟http://record.itl.endeca.com/═!http://recordstore.itl.endeca.com/≡=?↨startTransactionResponse=?♣return=?☺id?26   ≡

Step:1

Go to $WL_HOME/../user_projects/domains/base_domain/config/
And add the following In config.xml

<log-filter>
    <name>CXFFilter</name>
    <filter-expression>((SUBSYSTEM = 'org.apache.cxf.interceptor.LoggingOutInterceptor') OR (SUBSYSTEM = 'org.apache.cxf.interceptor.LoggingInInterceptor')) AND (SEVERITY = 'WARNING')</filter-expression>
  </log-filter>

 <server>
   <name>Prod</name>
   <log>
     <log-file-filter>CXFFilter</log-file-filter>
     <stdout-filter>CXFFilter</stdout-filter>
     <memory-buffer-severity>Debug</memory-buffer-severity>
   </log>
   <listen-port>7103</listen-port>
   <web-server>
     <web-server-log>
       <number-of-files-limited>false</number-of-files-limited>
     </web-server-log>
   </web-server>
   <listen-address></listen-address>
 </server>

For the server which you were using should be updated . with this filter .

You have to define for the server and after that restart the weblogic  admin and managed server .

You can also define this from WebLogic console which is very easy when compared to this.

<YOUR_DOMAIN>/logfilters/


create the new filter termed  CXFFilter for the expression give  the below 


((SUBSYSTEM = 'org.apache.cxf.interceptor.LoggingOutInterceptor') OR (SUBSYSTEM = 'org.apache.cxf.interceptor.LoggingInInterceptor')) AND (SEVERITY = 'WARNING')


then go to your corresponding server and select logging, for the LogFile and Standard out give the filter as CXFFilter , save and restart the server .


Step:2

Go to <JAVA_HOME>\jre\lib\logging.properties  and set the following properties

org.apache.cxf.interceptor.LoggingInInterceptor.level = WARNING
org.apache.cxf.interceptor.LoggingOutInterceptor.level = WARNING


After Setting up this then you have to Start the Server and start indexing . Happy Indexing !!!!!!
Thursday, 23 March 2017

Endeca 11.2 Migration

Hi Friends ,
Today we are going to see some interesting topic about migrating Endeca to 11.2 version , which consists of some interesting steps which you have not done Earlier .This Tutorial aims to be describing the step by step approach to be followed.

Before Start executing these tutorials, I would recommend to read my earlier blog regarding the ATG migration, which may be interesting to follow up.

Step1:

App Migration:

I would recommend you to compare 11.1 and 11.2 app structures and move the newly changed files to 11.1 app structures, use software’s like beyond compare for this comparison. When you don’t have earlier 11.1 project specific app structure then you can go head and creating the app from the crs deployment template of 11.2, for application creation you can refer my blog here.

In the App level some of the legacy import has been replaced. The content has been identified with the json files

Eg

Make sure the following file is avalaible in the Folder C:\Endeca\Apps\ATGen\control\..\config\import
_@@PROJECT_NAME@@.json

{"ecr:type": "site"}
Some of the Scripts for execution has been removed completely, when you do a compare you will come to know.

Step:2

After the Installation login to the workbench http://localhost:8006/
When you are logging for the first time, 11.2 feature asks you to change the password change it make sure you are using the unique password, this password has to be registered in to the Endeca and ATG Side so remember it .

Step:3

Initialize the Application from control directory of the application. When you do initialization you will face the below issue while provisioning the site to IFCR .

[07.22.16 15:09:46] SEVERE: Unauthorized (401): Unauthorized access to workbench. Please check your credentials in WorkbenchConfig.xml/OCS. If problem still persists, please contact your administrator.
Occurred while executing line 3 of valid BeanShell script:
[[

1|
2|      
3|    IFCR.provisionSite();
4|    CAS.importDimensionValueIdMappings("Discover-dimension-value-id-manager",
5|         InitialSetup.getWorkingDir() + "/test_data/initial_dval_id_mappings.csv");
6|     

]]

[07.22.16 15:09:46] SEVERE: Caught an exception while invoking method 'run' on object 'InitialSetup'. Releasing locks.

Caused by java.lang.reflect.InvocationTargetException
sun.reflect.NativeMethodAccessorImpl invoke0 - null
Caused by com.endeca.soleng.eac.toolkit.exception.AppControlException
com.endeca.soleng.eac.toolkit.script.Script runBeanShellScript - Error executing valid BeanShell script.
Caused by com.endeca.soleng.eac.toolkit.utility.IFCRUtility$HttpStatusException
com.endeca.soleng.eac.toolkit.utility.IFCRUtility execute - Unauthorized (401): Unauthorized access to workbench. Please check your credentials in WorkbenchConfig.xml/OCS. If problem still persists, please contact your administrator.

Failure to initialize EAC application.

The Solution for this is go to Tools and Frameworks Directory and go to credential store directory and execute the below command

manage_credentials.bat add --config ..\..\server\workspace\credential_store\jps-config.xml --mapName endecaToolsAndFrameworks --user admin --key ifcr --type password


don’t forget to give the –config of you are not giving the Config then it will not update the Password in jps-config.xml

it will ask for the username and password give the username as admin and password as same password which you changed for the workbench.  It will prompt that key already exists do you want to update give yes for it .


Step:4

Change this config repository password in cas also.
C:\Endeca\Apps\ATGen\config\cas\last-mile-crawl.xml
After you changed , do initializeservices this time it will initialize without errors .

Step:5

You are set when you want to trigger indexing from dyn admin you need to perform more operations


Other wise you will face com.endeca.repository.importer.ImporterException: Unable to connect to config repository on localhost.localdomain:8006 with user admin, Response:HTTP/1.1 401 Unauthorized


Solution:

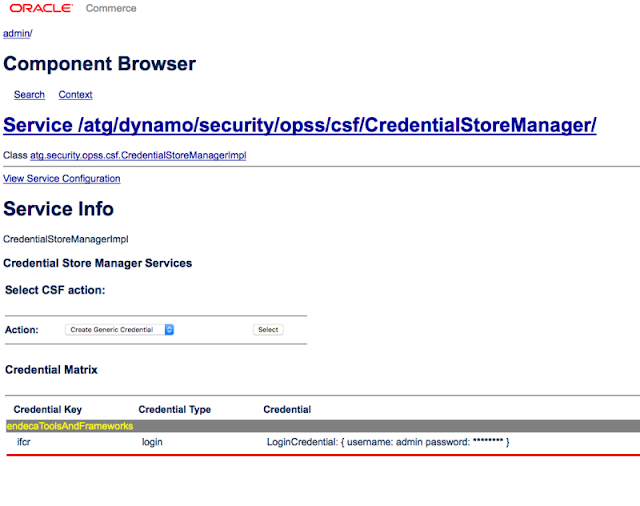
Go to the component

http://localhost:8015/dyn/admin/nucleus//atg/dynamo/security/opss/csf/CredentialStoreMana
ger/
select
CreateLogin CredentialStoreManager

And click select if it is givin error like below java.security.AccessControlException: Access Denied

Then go to the C:\Java\jdk1.8.0_21\jre\lib and open the file java.policy and  add the following line in to the grant option.

permission java.security.AllPermission;

after this changes then again restart the server and go to the component CredentialStoreManager

do the same

CreateLogin CredentialStoreManager/
credental key ifcr
credential type login
username
password
here username and password is the same as you have given earlier  . once if you give it all , it will be highlighted in yellow which states your changes has picked .


So now you are done with the Endeca Changes now from java changes.


Endeca 11.2 Java changes

Class Named NavigationStateProcessor has changed it’s below method

public void process (NavigationState pNavigationState)

to

public NavigationState process (NavigationState pNavigationState)

So Congratulations for migrating to 11.2 .


Monday, 20 March 2017

Multiple-MDEX Content Configurations

Many of the Endeca Applications are done with Single MDEX environment, whereas the Applications having the Multiple Languages, it will be challenging to achieve the Indexing and Assembler Configuration. So We Can See what are the Changes have to be done, so that it can handle the Multiple MDEX environments.

Step:1

Create one EAC application per language (for example,  If you are having three Languages then Create the app for each Language ATGen, ATGes, and ATGde).

Modify the /atg/endeca/ApplicationConfiguration component of your server configuration. Set the defaultLanguageForApplications to null, and set the keyToApplicationName property to create a mapping of application keys to application names is configured for the Different Languages . For example:

defaultLanguageForApplications^=/Constants.null
keyToApplicationName=\
en=ATGen,\
de=ATGde,\
es=ATGes

Modify the /atg/endeca/assembler/AssemblerApplicationConfiguration component of your server configuration to set the applicationKeyToMdexHostAndPort property to create a mapping of application keys to hostname/port combinations. For example:

applicationKeyToMdexHostAndPort=\
en=localhost:15000,\
de=localhost:16000,\
es=localhost:17000

Step:2

For each EAC application, create a properties file for the corresponding FileStoreFactory component. Set the $class property to atg.endeca.assembler.content.ExtendedFileStoreFactory:

$class=atg.endeca.assembler.content.ExtendedFileStoreFactory

Set the configurationPath property of each FileStoreFactory component to the file-system pathname of the directory to retrieve promoted content from. For example, the configurationPath property for the FileStoreFactory component associated with an EAC application named ATGde might be:

configurationPath=\
ToolsAndFrameworks/11.0.0/server/workspace/state/repository/ATGde

Step:3

Modify the /atg/endeca/assembler/AssemblerApplicationConfiguration component in the local server configuration. Set the useFileStoreFactory property to true to automatically set a reference to the corresponding FileStoreFactory on the application’s WorkbenchContentSource:
useFileStoreFactory=true

Step:4

Set the applicationKeyToStoreFactory property of the AssemblerApplicationConfiguration component to map application keys to the FileStoreFactory components you created. For example:

applicationKeyToStoreFactory=\
en=/atg/endeca/assembler/cartridge/manager/FileStoreFactory_en,\
es=/atg/endeca/assembler/cartridge/manager/FileStoreFactory_es,\
de=/atg/endeca/assembler/cartridge/manager/FileStoreFactory_de

Step:5

Modify the /atg/endeca/assembler/admin/EndecaAdministrationService component in the local server configuration. Set the $class property to atg.endeca.assembler.MultiAppAdministrationService:
$class=atg.endeca.assembler.MultiAppAdministrationService
The MultiAppAdministrationService class is able to handle updates to multiple store factory instances.


For Multiple Application Indexing We can See in the Separate Post .

ATG 11.2 Migration

Hi Readers, Most of us when Migrating from one version to another will have a lot Questions in their Mind. How to Start with and what are the things to be considered While Migrating to the Newer Version, so in this Tutorial I am going to list down some of the Common Approaches to be followed while Migration.

Step:1

The First and Foremost thing you have to do is Download the guide named  Oracle Commerce Platform 11.2 Migration Documentation. This will give you certain approaches like CIM installation and Manual installations.

Step:2

In the Same Oracle Commerce Platform 11.2 Migration Documentation Directory you will find the Patches to be Download from the Oracle Support Site , Download it.

Step:3

Once You Download the Patch, for 11.2 there are two types of the Patch for DB Scripts available, one for ATG and another for CSC . Endeca Changes also comes as part of the ATG.

Separate the Scripts based on the CAT, CORE, PUB,AGENT ,

How you can identify the Scripts belong to which schema is?

Identify the Scripts in the Alter Table Execute in the Previous Schemas and Identify, and all the Scripts given in the Versioned Folder should be Separated and  executed only in the PUB Schema . There are no Official details about the table execution in the Schema.  
Do the View Mapping Changes for the BCC and CSC.

Step:4

Once you are done with the Scripts Migration execute the Above In the respective Schema. Replace the Env variables In the Machine and Eclipse. So that it is pointing to the 11.2 Jars.

Step: 5

Do the Compilation Changes and Deploy Ear.  Follow the Migration Guide to Change the Java Specific Changes.

Step :6

Solve the Server Startup issues. Once it is Finished You are done!!!!

Endeca Migation Can be dealt in seperate Blog post. If You are Interested to migrate using CIM , it as good as the Command Prompt Selection. View Mapping Scripts are Executed in the Dynamo admin of the BCC.

Saturday, 18 March 2017

Bean filtering

The Main Idea Behind this Bean Filtering is to Remove the Unwanted Attributes from the Response that was Returned. In ATG and Endeca when we take most of the Services are From OOTB one Which has its own Model Class and the Response are as it is Defined in those Classes .

This Bean Filter Services gives the Way by which we dont need to alter the Logic, instead We can Define the Attributes to be Returned or not .

The BeanFilterService filters the properties of a java bean or repository item and converts beans into a map of properties. The BeanFilterService reads XML definition files that define which properties of a Java class or repository item should be included in the filtered view of the object. The XML definitions include ways to remap property names and transform properties. 
By default, the BeanFilterService is applied to the ModelMap by the REST MVC framework before generating a JSON or XML response. However, you can filter objects at any time. 

There are two types of bean filters, 

1)repository items 

2)Java bean classes.

We are Going to See Detail about the Java Bean Classes 

How you can mention this bean filtering?  follow the following way 
 
<bean-filtering>
  <bean type="atg.userprofiling.Profile">
    <filter id="default">
      <property name="email" />
      <property name="lastName" />
      <property name="firstName" />
      <property name="dataSource" />
      <property name="homeAddress.postalCode" target="homeAddress.postalCode" />
      <property name="gender" />
      <property name="dateOfBirth" />
    </filter>
  </bean>
</bean-filtering>

From the above definition, we have defined bean Profile for which only the above properties will be  returned.  Other properties will be removed . 
 
Bean filters combine filter definitions from all classes or interfaces for an object using the filter-id property.

<bean type="atg.commerce.order.ElectronicShippingGroup>
    <filter id="summary">
      <property name="emailAddress"/>
      <property name="shippingAddress" hidden="true"/>
    </filter>
  <component>

When you define the hidden=true then that property will be removed . Once if you have defined in the above way it will be registered in the following component path 

/atg/dynamo/service/filter/bean/XmlFilterService 

This will be called on the final layer and return the properties defined .

Same like this Endeca has a contentItem bean filter which can be extended and used for filtering content item for endeca. You have to define each and every class like above to get removed .

Thursday, 2 March 2017

Triggering AutoIndexing in Stage Environment


Hi Guys , today I Gonna Share the WorkFlow for the Staging indexing , this tutorials will be very interesting with respect to the other functionalities because almost all is OOTB, you need to place right things In place.

ATG does not provide the automatic indexing enable for the staging env, you need to enable it .let’s find the detailed discussion below.
Before proceeding to this tutorial you need to make sure that you have the following modules built as part of your build.

BCC: DAF.Endeca.Index.Versioned,DCS. Endeca.Index.Versioned these two components are responsible for the Componets required for indexing in Staging env.

Staging: DAF.Endeca.Index,DCS.Endeca.Index

Once you are done with the above modules, you can proceed further.

1) Make sure to add the following outputconfig in /atg/search/repository/IndexingDeploymentListener

indexingOutputConfigs+=\
  /atg/commerce/search/ProductCatalogOutputConfig_staging

2) Make sure to update the staging details in following component /atg/search/SynchronizationInvoker_staging

host=10.20.30.70
port=1072

where 
host nameof staging
port  is staging rmi port

3)make sure that the /atg/commerce/search/IndexedItemsGroup_staging points to your productCatalog_Staging Repository to do that update the ProductCatalogOutputConfig_staging by following values

repositoryItemGroup=/atg/commerce/search/IndexedItemsGroup_staging/
repository^=/atg/commerce/search/IndexedItemsGroup_staging.repository

Only these changes are required to be done in the BCC Side.


We will see the Changes in the Staging side now

1) update the CategoryTreeService, RepositoryTypeDimensionExporter, SchemaExporter with the below changes

indexingOutputConfig=/atg/commerce/search/ProductCatalogOutputConfig_staging

2)update the ProductCatalogSimpleIndexingAdmin to points to /atg/commerce/search/ProductCatalogOutputConfig_staging during indexing .

phaseToPrioritiesAndTasks=\
  PreIndexing=5:CategoryTreeService,\
  RepositoryExport=10:\
    SchemaExporter;\
    CategoryToDimensionOutputConfig_staging;\
    RepositoryTypeDimensionExporter;\
    /atg/commerce/search/ProductCatalogOutputConfig_staging,\
  EndecaIndexing=15:EndecaScriptService

That’s it you are done with the Staging Indexing workflow .So after this changes once you deploy the project indexing will be triggered in both staging and production.

For Indexing only in Production you can refer my previous posts.


Happy Day