Wednesday, 12 July 2017

CredentialStoreManager Credentials Storage

Hi All ,
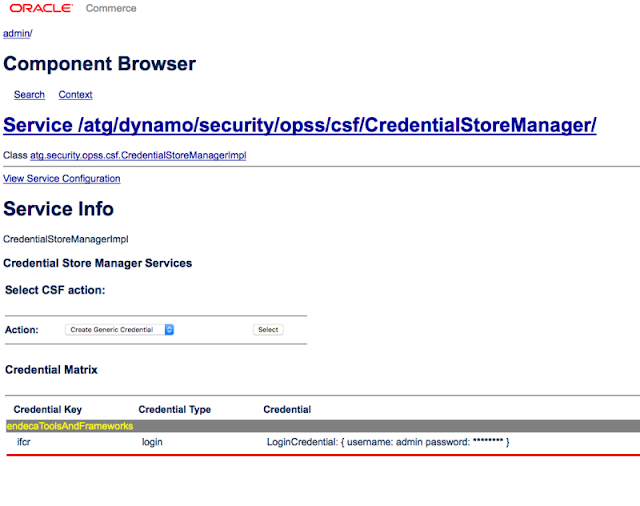
      We are going to see about the Component

/atg/dynamo/security/opss/csf/CredentialStoreManager

This class makes the calls that store and retrieve credentials from the credential store. Uses the map, key and credential properties parameters. It initiates JPS, retrieves the credential store and stores credentials in the store. Also used to delete credentials from the credential store..

When Indexing is triggered from the Dyn/admin Starting from 11.2 made mandatory to Store the Workbench Password and authenticate it before Indexing .

For Configuring the Credential you can refer my previous post here .

When you look at the above Component there is JPSConfigurationLocation is defined to it .It has the path for the jps-config.xml file . If you are pointing to the file same file created in the early stages of app creation update it with the path. If you are not pointing to it then create the Credentials again and give the same value of workbench.and save it . Once if you create it , will be stored to the {atg.dynamo.home}/security/jps-config.xml following location. so going forward it will take and from read the credentials from this location unless we are not deleting it .

In Places, where we are not installing and deploy only the Big Ear , we also need to create as a one step process . Make sure that the same location is referenced  all the time when changing the Ear. In my case the File is read from the following location.File C:\ATG\ATG11.3\home\security\jps-config.xml.

If you also face some error with the Creation of the Credential store you can refer my previous posts.

[MDEX] Failed to parse URL

Hi All,
       Most of us Face the issue relating to the MDEX very often. The Best way to Debug and Solve is to take the Url and paste it to the Browser and give the format=xml or json, once if you give like above you can able to identify which is the Missing Property . Usually this happens if the non index property is added as part of the Query and indulged in the operations like sorting or Filtering .

But Some Scenarios you have no clue of Identifying which property went wrong . It will take time to identify this.

Error:[MDEX] Failed to parse URL: '/graph?node=0&select=promoId&merchrulefilter=endeca.internal.nonexistent&groupby=promoId&offset=0&nbins=10&allbins=1&attrs=All|oil|mode+matchallpartial&autophrase=1&autophrasedwim=1&log=reqcom=NavigationRequest&sid=HCGcWoz2-aE_ncnZIJD0G89_UmEHFCiG10-NHa1we6pp9s8773_l%21-695473435%211497272464980&rid=270&irversion=652'

It will not give the exact property Where it gets failed . In the above url promoId Went wrong. When i check the Url it was not clear and check later promoID is the Rollup and none of the Rollup is set as part of the indexing . I fixed this by Setting the Index Config back again and triggering indexing.

Tuesday, 11 July 2017

Same Dimension Value Across all the Environments

Hi All,
    Most of us , When having more Environments will face issues regarding the Dimension Values Generation. I Have Faced a lot , though am not hard-coding the Dimension Values, faced issues relating to recreating the refinements  if any Dimension Change occur . Now we are going to see how to Handle this .

When you have Indexing Successful in any environment, then Import its Dimension Values Using Below Command / Script

When the App is Created using the CRS Deployment Template, go to the Location /opt/endeca/apps/ATGen/test_data/ You Will Find a file called initial_dval_id_mappings.csv
Delete it and Proceed to Execte the Command, this Command has to be Executed from the CAS bin.

sh cas-cmd.sh exportDimensionValueIdMappings -m appName-dimension-value-id-manager -f /opt/endeca/apps/ATGen/test_data/initial_dval_id_mappings.csv 

Don't Forget to Create the Output File with the Following name initial_dval_id_mappings.csv , if you are Changing it you have to Change in the Script as well . It is better to use the Same .

Once this File is Created Check it out , you will have all the Dimensions Indexed as part of your Indexing. This File Has to be Moved Across all the Environment and Initialize_services.sh has to be called for the First Time. Once it is Called Going Forward all the Dimension values will remain same as the Lower Environment .

initial_dval_id_mappings.csv this file  will be called as part of the InitialSetup during the Initialize_Services.sh .

<script id="InitialSetup">
<bean-shell-script>
<![CDATA[
IFCR.provisionSite();
CAS.importDimensionValueIdMappings("TAen-dimension-value-id-manager",
InitialSetup.getWorkingDir() + "/test_data/initial_dval_id_mappings.csv");
]]>
</bean-shell-script>
</script>

Apart from this Approach we can also do the ImportDimensionValueIdMappings Script. Using the File Will make the Dimension Value not to Change for the Longer Run.


Sunday, 9 July 2017

Config Repository Error

Hi All,
   Today , I was facing some Strange Error in Production, Which is causing the Indexing not to be succeed and it is failing . We analysed the issue.

Caused by: com.endeca.soleng.eac.toolkit.exception.CasCommunicationException: Error Starting baseline crawl 'ATGen-last-mile-crawl'.Unable to login to config repository site for user "admin", status code: 401, Response:

ROOT CAUSE:
It seems to be config repository password got changed and it is unable to login in to it, during Indexing .


IDENTIFICATION:

We tried Many approaches Starting From Creating the Config Password and Changing it in the Credential Store Manager , which seems to be the Wrong Solution.

SOLUTION:
After Struggling for the hours together , we came in to the Solution of Deleting the Config Repository and Recreating it . Which is the Correct Solution and Worked also.

WARNING:
When you are deleting the Config Repository, we should be Aware that we are not Performing it , When the Site is Live or Busy, because Recreating the Crawl will change the Dimensions Id, Which will not have any impact if it was having Dimensions id Imported.If not all the Dimensions will change you will be having the Tough Time .  

This Issue was identified Often in Endeca 11.2 , not sure why it is exactly happening can fix this as of now with the above Solution . Happy Tricking !!!


Sunday, 7 May 2017

Whats new in Oracle Commerce 11.3

Hi All,
    Oracle's new commerce release has given answer to the queries, what is the next version of Commerce, how they are going to proceed with the UpComing Platforms, what are the Features .

Yes the Newer version of the Oracle commerce Platform has been released its 11.3 , looking in to it , oracle going to be the veteran in the commerce platform. I am one among the Followers of the oracle commerce versions regularly, this time oracle has concentrated more on the Business Standards and implemented new technologies for the faster access of their Tools and industry Standards.

Oracle Commerce is also certified to run on Oracle’s public cloud infrastructure, using Compute and database cloud service. This helps commerce owner’s additional flexibility to deploy and operated oracle commerce.

We can see the Changes with respect to this version below

Installation

As per the Oracle official docs this version going to be a Major version, which means full installation is required for this version.

Oracle Commerce Platform

This version of Oracle commerce has many new changes with respect to the Rest Framework, This latest framework allows the user simplification in  interaction with the platform .It uses the Jersey as underlying implementation .It is JAXRS 2.0  compliant Framework. It gives importance for the API Versioning, locking, transitions, caching, localization, filtering , resource version tracking ,exception mapping, relation registry, self-documentation (via Swagger) and asynchronous endpoints . It allows easily adoption for the developers who don’t know Oracle commerce.

Family resemblance between Oracle Commerce and other Oracle CX applications making it simpler to code to multiple Oracle Commerce CX suite applications.  Design Pattern Based Approach for Rest Interfaces.

It is already Coming up with the some of the Rest out of box services , which allows for faster development and Extensibility.

BCC

Purge Tool is used for the purging old versions of the CA versioned repositories. It has Changes in the Memory Efficiency, when compared to the earlier versions of the Commerce Performing export of larger catalog update with lesser amount of time and lesser memory in use.  The Queries executing the versioned repositories are improved.

Many of the people have faced delay of loading the BCC in their Machines earlier, Oracle Uses the Flex and which is being replaced by the (JET) Oracle javascript Extension Toolkit. Which makes faster for the Users to access and UI is with the Industry Standards. The BCC’s Targeting and Segmentation UI, previously implemented in JavaServer Pages (JSP), has been rewritten in Oracle JET

Oracle commerce Guided Search

MDEX

All of you have wondered , why the Oracle commerce Guided Search has Difference Versions eg MDEX 6.5.2 and other components are 11.2 and so, this has been changed in this version to 11.3 Mdex also comes with the same version in this release.

It provides the enhanced TypeAhead functionality . OLT is needed to be exists in the MDEX which has been lifted and Multiple OLT can exists in the same mdex. Restful Apis has been introduced.

Experience Manager

As like BCC, the Experience Manager UI is also redesigned with the Oracle JET , which allows for the faster access  and Industry standards. New SDK with respect to the Experience Manager which allows for the Extensibility.

Earlier Versions the cartridges were developed only with the XML files , which has been replaced with the JSON. But Still users can Import their Existing XML and Convert them to the JSON based Templates, this was introduced for Better Memory optimization. Apart from these changes some new UI changes are also brought In place.

Rule manager was removed in this version and customers who are using this have to move to the Experience Manager.   


I was excited in Reading this Cool new features introduced by oracle. The detailed information about installation, configuration and migration can be seen in the upcoming Topics . Hope you enjoyed reading it . Subscribe for the newer Topics .

Saturday, 6 May 2017

Input Record Does not have a valid Id

Hi All, Today I was Facing some weird Exception , I didn’t understand at the First then I started understanding that the Exception was due to the Deployment Template, below is the trace of the Exception.

ERROR /atg/search/repository/BulkLoader -
atg.repository.search.indexing.IndexingException: Error sending record atg.endeca.index.record.Record@c28a71bd

Root cause: Input record does not have a valid Id. at atg.endeca.index.RecordStoreDocumentSubmitterSessionImpl.submitRecord(RecordStoreDocumentSubmitterSessionImpl.java:436) at atg.endeca.index.RecordSubmitterSessionImpl.submitDocument(RecordSubmitterSessionImpl.java:240) at atg.endeca.index.AbstractRecordStoreAggregateSession.submitDocument(AbstractRecordStoreAggregateSession.java:357) at atg.repository.search.indexing.LoaderImpl.outputAndSubmitDocument(LoaderImpl.java:1167)


This Happened Because, I was using the CRS Deployment Template to create the app, as part of the Migration, and we have created the app using the Discover Deployment Template. Discover uses common.id and CRS uses the record.id as the common identifier for the record.

Solution is to Change the app back to the CRS this issue will be resolved. 

Saturday, 8 April 2017

What’s new in Oracle Commerce Guided Search 11.2

Hi Followers,

When I say, I am working on the ATG migration; first question all will ask is that what is new in it. I though this will be the best forum to share what’s new in it. I described the content in very shorter way, that all can understand quickly. I have shared some important features in ATG as well.

Index Partitioning

The Oracle Commerce multisite framework allows merchants to run multiple different web sites on the same instance of Commerce; hence the indexing is also improved to support this feature. The Main Changes that were brought in oracle commerce guided search 11.2 is that, it allows for the configuration of how site data is partitioned into search indexes. Administrators can select which sites’ data will be indexed in which index, thus allowing the data to be partitioned across multiple MDEX indexes

Unified Reporting

Reporting features has been improved, from the Guided Search product with reporting from the Commerce Platform. This allows analysis of the data such as top search terms by site, by segment, or even by items purchased.
Out of the box, reports are provided to help give valuable insight into customer activity with Search. These include key analysis such as top search terms, search terms with zero results, search terms that led to the most sales, and most used facet values. Where the out of the box reports do not meet a particular need, Oracle Business Intelligence’s powerful capabilities may be used to create custom reports, ad-hoc queries, and bespoke dashboards.

Language Support

Language support is improved by adding the new languages and improving the search results and customer experience.
It supports the following languages, so totally 50 languages are supported in it.


Oracle Commerce Workbench


Experience Manager Projects

Experience Manager Capabilities has been improved a lot in this version, for example the Experience Manager has been released same like BCC with the Assets Flow.  The Experience manager allows multiple users can work on the project parallel same like the BCC. If the Conflict happened then it cannot be modified by the other user and he will be notified. A simple prebuilt approval process that allows users to make changes and commit them is being introduced. It provides the visibility to changes done before committing.

Interactive editing can be done in preview actively, without having to switch between preview and data view. A new Manifest pane provides details of the various page elements. Users can edit page elements from the Manifest pane and see the effect of their changes on the preview page.ie WYSIWYG editing mode. Business users can now also set up different form factors for different types of devices (desktop, tablet, mobile, etc.) that will allow them to preview the same page for different devices.

Site Specific Keyword Redirects

The Workbench keyword redirect tool has been enhanced in 11.2, allowing business users to add keyword redirects that are specific to a given site in a multi-site environment. IT users can add a keyword redirects group and associate the group to a specific site, allowing business users to manage keyword redirects at the site level by working with the group. A default keyword redirects group ships with the product, while additional ones can be created and assigned to other sites.
Administrators can restrict access permissions for these groups so that only certain users can add keyword redirects to a certain site.

Some Important Features in oracle commerce 11.2

To better achieve goal of Omni Channel Experience, Commerce 11.2 adds significant new capabilities to support omni-channel commerce. The new Commerce Store Accelerator (CSA) reference application provides a responsive, modern, up to date starter store to assist merchants in creating their storefront and support desktop, tablet and mobile devices.

BCC

Commerce 11.0 and 11.1 added new content management capabilities to the Commerce platform and version 11.2 continues with new functionality in this area. Media files can now be directly uploaded within the BCC and stored on the Commerce servers, without the need for external systems. With the prior investments and the new 11.2 features, more and more merchants will be able to manage all their content and commerce in a single application, Oracle Commerce

Pricing

The pricing engine has also been updated to allow prices to vary by time. This allows business users to set up multiple prices ahead of time, with the appropriate start and end times. While this is valuable for managing day to day price changes, it also makes supporting various pricing strategies such as flash sales, simpler and easier to manage.

For ATG 11.2 Migration Read my previous blog here. For Endeca Migration Read my blog here .


Happy Learning !!!! 

Friday, 7 April 2017

Timezone Region not found Exception in Weblogic

Hi Readers,

Good Day!! Today we are going to see not the technical, but some strange Exception which I faced while upgrading my web logic to 12.1.3, though the exception looks simple, Identifying and rectifying this issue will be challenging. If any of this readers face same exception it is enough you follow only this, will work exactly.

This error exactly will be caused, when configuring the Data Sources in Weblogic . We used to configure the weblogic datasources by configuring the JNDI name,Driver Name, username and password after the configuration if we try to do TestConfiguration then will get the below error

Message icon - Error Connection test failed.
Message icon - Error ORA-00604: error occurred at recursive SQL level 1 ORA-01882: timezone region not found <br/>oracle.jdbc.driver.T4CTTIoer.processError(T4CTTIoer.java:450)<br/>oracle.jdbc.driver.T4CTTIoer.processError(T4CTTIoer.java:392)<br/>oracle.jdbc.driver.T4CTTIoer.processError(T4CTTIoer.java:385)<br/>oracle.jdbc.driver.T4CTTIfun.processError(T4CTTIfun.java:1018)<br/>oracle.jdbc.driver.T4CTTIoauthenticate.processError(T4CTTIoauthenticate.java:501)<br/>oracle.jdbc.driver.T4CTTIfun.receive(T4CTTIfun.java:522)<br/>oracle.jdbc.driver.T4CTTIfun.doRPC(T4CTTIfun.java:257)<br/>oracle.jdbc.driver.T4CTTIoauthenticate.doOAUTH(T4CTTIoauthenticate.java:437)<br/>oracle.jdbc.driver.T4CTTIoauthenticate.doOAUTH(T4CTTIoauthenticate.java:954)<br/>oracle.jdbc.driver.T4CConnection.logon(T4CConnection.java:639)<br/>oracle.jdbc.driver.PhysicalConnection.connect(PhysicalConnection.java:666)<br/>oracle.jdbc.driver.T4CDriverExtension.getConnection(T4CDriverExtension.java:32)<br/>oracle.jdbc.driver.OracleDriver.connect(OracleDriver.java:566)<br/>oracle.jdbc.pool.OracleDataSource.getPhysicalConnection(OracleDataSource.java:317)<br/>oracle.jdbc.xa.client.OracleXADataSource.getPooledConnection(OracleXADataSource.java:486)<br/>oracle.jdbc.xa.client.OracleXADataSource.getXAConnection(OracleXADataSource.java:174)<br/>oracle.jdbc.xa.client.OracleXADataSource.getXAConnection(OracleXADataSource.java:109)<br/>weblogic.jdbc.common.internal.DataSourceUtil.testConnection0(DataSourceUtil.java:356)<br/>weblogic.jdbc.common.internal.DataSourceUtil.access$000(DataSourceUtil.java:22)<br/>weblogic.jdbc.common.internal.DataSourceUtil$1.run(DataSourceUtil.java:254)<br/>...

If you encounter this type of exception, then you have to follow below steps

Navigate to <WEBLOGIC-INSTALLED DIR>\user_projects\domains\<YOUR-DOMAIN>\bin then 

open the file named setDomainEnv.cmd 

Search for the Property called JAVA_PROPERTIES ad update that property with  the below values

JAVA_PROPERTIES="-Dwls.home=${WLS_HOME} -Dweblogic.home=${WLS_HOME} -Duser.timezone="GMT""

That means you are defining the Time zone which is not defined.  I am defining the GMT because it’s my Time Zone.

After the Changes, you can restart the Managed server then try configuring the Data Source now, you will not face this exception again. That’s it you are done.

Happy Time Saving !!!!!

Friday, 24 March 2017

Weblogic cxf logging services

When you face the below logs in web logic console and the console stopped unexpectedly or hangs or stepped unexpectedly , then you have to follow the below steps for resolving it.

Mar 24, 2017 6:44:55 PM org.apache.cxf.services.RecordStoreService.RecordStorePort.RecordStore
INFO: Outbound Message
---------------------------
ID: 1
Address: http://localhost:8500/ATGen-dimvals/
Encoding: UTF-8
Content-Type: text/xml
Headers: {Accept=[application/fastinfoset, */*], Accept-Encoding=[gzip;q=1.0, identity; q=0.5, *;q=0], SOAPAction=[""]}
Payload: <soap:Envelope xmlns:soap="http://schemas.xmlsoap.org/soap/envelope/"><soap:Body><startTransaction xmlns="http://recordstore.itl.endeca.com/" xmlns:ns2="http://record.itl.endeca.com/"><transactionType>READ_WR
--------------------------------------
Mar 24, 2017 6:44:55 PM org.apache.cxf.services.RecordStoreService.RecordStorePort.RecordStore
INFO: Inbound Message
----------------------------
ID: 1
Response-Code: 200
Encoding: ISO-8859-1
Content-Type: application/fastinfoset
Headers: {Content-Length=[196], content-type=[application/fastinfoset], Date=[Fri, 24 Mar 2017 13:14:55 GMT], Server=[Jetty(6.1.26)]}
Payload: α ☺ 8╧♥soap(http://schemas.xmlsoap.org/soap/envelope/≡???Envelope???♥Body8╧☻ns2∟http://record.itl.endeca.com/═!http://recordstore.itl.endeca.com/≡=?↨startTransactionResponse=?♣return=?☺id?26   ≡

Step:1

Go to $WL_HOME/../user_projects/domains/base_domain/config/
And add the following In config.xml

<log-filter>
    <name>CXFFilter</name>
    <filter-expression>((SUBSYSTEM = 'org.apache.cxf.interceptor.LoggingOutInterceptor') OR (SUBSYSTEM = 'org.apache.cxf.interceptor.LoggingInInterceptor')) AND (SEVERITY = 'WARNING')</filter-expression>
  </log-filter>

 <server>
   <name>Prod</name>
   <log>
     <log-file-filter>CXFFilter</log-file-filter>
     <stdout-filter>CXFFilter</stdout-filter>
     <memory-buffer-severity>Debug</memory-buffer-severity>
   </log>
   <listen-port>7103</listen-port>
   <web-server>
     <web-server-log>
       <number-of-files-limited>false</number-of-files-limited>
     </web-server-log>
   </web-server>
   <listen-address></listen-address>
 </server>

For the server which you were using should be updated . with this filter .

You have to define for the server and after that restart the weblogic  admin and managed server .

You can also define this from WebLogic console which is very easy when compared to this.

<YOUR_DOMAIN>/logfilters/


create the new filter termed  CXFFilter for the expression give  the below 


((SUBSYSTEM = 'org.apache.cxf.interceptor.LoggingOutInterceptor') OR (SUBSYSTEM = 'org.apache.cxf.interceptor.LoggingInInterceptor')) AND (SEVERITY = 'WARNING')


then go to your corresponding server and select logging, for the LogFile and Standard out give the filter as CXFFilter , save and restart the server .


Step:2

Go to <JAVA_HOME>\jre\lib\logging.properties  and set the following properties

org.apache.cxf.interceptor.LoggingInInterceptor.level = WARNING
org.apache.cxf.interceptor.LoggingOutInterceptor.level = WARNING


After Setting up this then you have to Start the Server and start indexing . Happy Indexing !!!!!!

Thursday, 23 March 2017

Endeca 11.2 Migration

Hi Friends ,
Today we are going to see some interesting topic about migrating Endeca to 11.2 version , which consists of some interesting steps which you have not done Earlier .This Tutorial aims to be describing the step by step approach to be followed.

Before Start executing these tutorials, I would recommend to read my earlier blog regarding the ATG migration, which may be interesting to follow up.

Step1:

App Migration:

I would recommend you to compare 11.1 and 11.2 app structures and move the newly changed files to 11.1 app structures, use software’s like beyond compare for this comparison. When you don’t have earlier 11.1 project specific app structure then you can go head and creating the app from the crs deployment template of 11.2, for application creation you can refer my blog here.

In the App level some of the legacy import has been replaced. The content has been identified with the json files

Eg

Make sure the following file is avalaible in the Folder C:\Endeca\Apps\ATGen\control\..\config\import
_@@PROJECT_NAME@@.json

{"ecr:type": "site"}
Some of the Scripts for execution has been removed completely, when you do a compare you will come to know.

Step:2

After the Installation login to the workbench http://localhost:8006/
When you are logging for the first time, 11.2 feature asks you to change the password change it make sure you are using the unique password, this password has to be registered in to the Endeca and ATG Side so remember it .

Step:3

Initialize the Application from control directory of the application. When you do initialization you will face the below issue while provisioning the site to IFCR .

[07.22.16 15:09:46] SEVERE: Unauthorized (401): Unauthorized access to workbench. Please check your credentials in WorkbenchConfig.xml/OCS. If problem still persists, please contact your administrator.
Occurred while executing line 3 of valid BeanShell script:
[[

1|
2|      
3|    IFCR.provisionSite();
4|    CAS.importDimensionValueIdMappings("Discover-dimension-value-id-manager",
5|         InitialSetup.getWorkingDir() + "/test_data/initial_dval_id_mappings.csv");
6|     

]]

[07.22.16 15:09:46] SEVERE: Caught an exception while invoking method 'run' on object 'InitialSetup'. Releasing locks.

Caused by java.lang.reflect.InvocationTargetException
sun.reflect.NativeMethodAccessorImpl invoke0 - null
Caused by com.endeca.soleng.eac.toolkit.exception.AppControlException
com.endeca.soleng.eac.toolkit.script.Script runBeanShellScript - Error executing valid BeanShell script.
Caused by com.endeca.soleng.eac.toolkit.utility.IFCRUtility$HttpStatusException
com.endeca.soleng.eac.toolkit.utility.IFCRUtility execute - Unauthorized (401): Unauthorized access to workbench. Please check your credentials in WorkbenchConfig.xml/OCS. If problem still persists, please contact your administrator.

Failure to initialize EAC application.

The Solution for this is go to Tools and Frameworks Directory and go to credential store directory and execute the below command

manage_credentials.bat add --config ..\..\server\workspace\credential_store\jps-config.xml --mapName endecaToolsAndFrameworks --user admin --key ifcr --type password


don’t forget to give the –config of you are not giving the Config then it will not update the Password in jps-config.xml

it will ask for the username and password give the username as admin and password as same password which you changed for the workbench.  It will prompt that key already exists do you want to update give yes for it .


Step:4

Change this config repository password in cas also.
C:\Endeca\Apps\ATGen\config\cas\last-mile-crawl.xml
After you changed , do initializeservices this time it will initialize without errors .

Step:5

You are set when you want to trigger indexing from dyn admin you need to perform more operations


Other wise you will face com.endeca.repository.importer.ImporterException: Unable to connect to config repository on localhost.localdomain:8006 with user admin, Response:HTTP/1.1 401 Unauthorized


Solution:

Go to the component

http://localhost:8015/dyn/admin/nucleus//atg/dynamo/security/opss/csf/CredentialStoreMana
ger/
select
CreateLogin CredentialStoreManager

And click select if it is givin error like below java.security.AccessControlException: Access Denied

Then go to the C:\Java\jdk1.8.0_21\jre\lib and open the file java.policy and  add the following line in to the grant option.

permission java.security.AllPermission;

after this changes then again restart the server and go to the component CredentialStoreManager

do the same

CreateLogin CredentialStoreManager/
credental key ifcr
credential type login
username
password
here username and password is the same as you have given earlier  . once if you give it all , it will be highlighted in yellow which states your changes has picked .


So now you are done with the Endeca Changes now from java changes.


Endeca 11.2 Java changes

Class Named NavigationStateProcessor has changed it’s below method

public void process (NavigationState pNavigationState)

to

public NavigationState process (NavigationState pNavigationState)

So Congratulations for migrating to 11.2 .


Monday, 20 March 2017

Multiple-MDEX Content Configurations

Many of the Endeca Applications are done with Single MDEX environment, whereas the Applications having the Multiple Languages, it will be challenging to achieve the Indexing and Assembler Configuration. So We Can See what are the Changes have to be done, so that it can handle the Multiple MDEX environments.

Step:1

Create one EAC application per language (for example,  If you are having three Languages then Create the app for each Language ATGen, ATGes, and ATGde).

Modify the /atg/endeca/ApplicationConfiguration component of your server configuration. Set the defaultLanguageForApplications to null, and set the keyToApplicationName property to create a mapping of application keys to application names is configured for the Different Languages . For example:

defaultLanguageForApplications^=/Constants.null
keyToApplicationName=\
en=ATGen,\
de=ATGde,\
es=ATGes

Modify the /atg/endeca/assembler/AssemblerApplicationConfiguration component of your server configuration to set the applicationKeyToMdexHostAndPort property to create a mapping of application keys to hostname/port combinations. For example:

applicationKeyToMdexHostAndPort=\
en=localhost:15000,\
de=localhost:16000,\
es=localhost:17000

Step:2

For each EAC application, create a properties file for the corresponding FileStoreFactory component. Set the $class property to atg.endeca.assembler.content.ExtendedFileStoreFactory:

$class=atg.endeca.assembler.content.ExtendedFileStoreFactory

Set the configurationPath property of each FileStoreFactory component to the file-system pathname of the directory to retrieve promoted content from. For example, the configurationPath property for the FileStoreFactory component associated with an EAC application named ATGde might be:

configurationPath=\
ToolsAndFrameworks/11.0.0/server/workspace/state/repository/ATGde

Step:3

Modify the /atg/endeca/assembler/AssemblerApplicationConfiguration component in the local server configuration. Set the useFileStoreFactory property to true to automatically set a reference to the corresponding FileStoreFactory on the application’s WorkbenchContentSource:
useFileStoreFactory=true

Step:4

Set the applicationKeyToStoreFactory property of the AssemblerApplicationConfiguration component to map application keys to the FileStoreFactory components you created. For example:

applicationKeyToStoreFactory=\
en=/atg/endeca/assembler/cartridge/manager/FileStoreFactory_en,\
es=/atg/endeca/assembler/cartridge/manager/FileStoreFactory_es,\
de=/atg/endeca/assembler/cartridge/manager/FileStoreFactory_de

Step:5

Modify the /atg/endeca/assembler/admin/EndecaAdministrationService component in the local server configuration. Set the $class property to atg.endeca.assembler.MultiAppAdministrationService:
$class=atg.endeca.assembler.MultiAppAdministrationService
The MultiAppAdministrationService class is able to handle updates to multiple store factory instances.


For Multiple Application Indexing We can See in the Separate Post .

ATG 11.2 Migration

Hi Readers, Most of us when Migrating from one version to another will have a lot Questions in their Mind. How to Start with and what are the things to be considered While Migrating to the Newer Version, so in this Tutorial I am going to list down some of the Common Approaches to be followed while Migration.

Step:1

The First and Foremost thing you have to do is Download the guide named  Oracle Commerce Platform 11.2 Migration Documentation. This will give you certain approaches like CIM installation and Manual installations.

Step:2

In the Same Oracle Commerce Platform 11.2 Migration Documentation Directory you will find the Patches to be Download from the Oracle Support Site , Download it.

Step:3

Once You Download the Patch, for 11.2 there are two types of the Patch for DB Scripts available, one for ATG and another for CSC . Endeca Changes also comes as part of the ATG.

Separate the Scripts based on the CAT, CORE, PUB,AGENT ,

How you can identify the Scripts belong to which schema is?

Identify the Scripts in the Alter Table Execute in the Previous Schemas and Identify, and all the Scripts given in the Versioned Folder should be Separated and  executed only in the PUB Schema . There are no Official details about the table execution in the Schema.  
Do the View Mapping Changes for the BCC and CSC.

Step:4

Once you are done with the Scripts Migration execute the Above In the respective Schema. Replace the Env variables In the Machine and Eclipse. So that it is pointing to the 11.2 Jars.

Step: 5

Do the Compilation Changes and Deploy Ear.  Follow the Migration Guide to Change the Java Specific Changes.

Step :6

Solve the Server Startup issues. Once it is Finished You are done!!!!

Endeca Migation Can be dealt in seperate Blog post. If You are Interested to migrate using CIM , it as good as the Command Prompt Selection. View Mapping Scripts are Executed in the Dynamo admin of the BCC.

Saturday, 18 March 2017

Bean filtering

The Main Idea Behind this Bean Filtering is to Remove the Unwanted Attributes from the Response that was Returned. In ATG and Endeca when we take most of the Services are From OOTB one Which has its own Model Class and the Response are as it is Defined in those Classes .

This Bean Filter Services gives the Way by which we dont need to alter the Logic, instead We can Define the Attributes to be Returned or not .

The BeanFilterService filters the properties of a java bean or repository item and converts beans into a map of properties. The BeanFilterService reads XML definition files that define which properties of a Java class or repository item should be included in the filtered view of the object. The XML definitions include ways to remap property names and transform properties. 
By default, the BeanFilterService is applied to the ModelMap by the REST MVC framework before generating a JSON or XML response. However, you can filter objects at any time. 

There are two types of bean filters, 

1)repository items 

2)Java bean classes.

We are Going to See Detail about the Java Bean Classes 

How you can mention this bean filtering?  follow the following way 
 
<bean-filtering>
  <bean type="atg.userprofiling.Profile">
    <filter id="default">
      <property name="email" />
      <property name="lastName" />
      <property name="firstName" />
      <property name="dataSource" />
      <property name="homeAddress.postalCode" target="homeAddress.postalCode" />
      <property name="gender" />
      <property name="dateOfBirth" />
    </filter>
  </bean>
</bean-filtering>

From the above definition, we have defined bean Profile for which only the above properties will be  returned.  Other properties will be removed . 
 
Bean filters combine filter definitions from all classes or interfaces for an object using the filter-id property.

<bean type="atg.commerce.order.ElectronicShippingGroup>
    <filter id="summary">
      <property name="emailAddress"/>
      <property name="shippingAddress" hidden="true"/>
    </filter>
  <component>

When you define the hidden=true then that property will be removed . Once if you have defined in the above way it will be registered in the following component path 

/atg/dynamo/service/filter/bean/XmlFilterService 

This will be called on the final layer and return the properties defined .

Same like this Endeca has a contentItem bean filter which can be extended and used for filtering content item for endeca. You have to define each and every class like above to get removed .

Thursday, 2 March 2017

Triggering AutoIndexing in Stage Environment


Hi Guys , today I Gonna Share the WorkFlow for the Staging indexing , this tutorials will be very interesting with respect to the other functionalities because almost all is OOTB, you need to place right things In place.

ATG does not provide the automatic indexing enable for the staging env, you need to enable it .let’s find the detailed discussion below.
Before proceeding to this tutorial you need to make sure that you have the following modules built as part of your build.

BCC: DAF.Endeca.Index.Versioned,DCS. Endeca.Index.Versioned these two components are responsible for the Componets required for indexing in Staging env.

Staging: DAF.Endeca.Index,DCS.Endeca.Index

Once you are done with the above modules, you can proceed further.

1) Make sure to add the following outputconfig in /atg/search/repository/IndexingDeploymentListener

indexingOutputConfigs+=\
  /atg/commerce/search/ProductCatalogOutputConfig_staging

2) Make sure to update the staging details in following component /atg/search/SynchronizationInvoker_staging

host=10.20.30.70
port=1072

where 
host nameof staging
port  is staging rmi port

3)make sure that the /atg/commerce/search/IndexedItemsGroup_staging points to your productCatalog_Staging Repository to do that update the ProductCatalogOutputConfig_staging by following values

repositoryItemGroup=/atg/commerce/search/IndexedItemsGroup_staging/
repository^=/atg/commerce/search/IndexedItemsGroup_staging.repository

Only these changes are required to be done in the BCC Side.


We will see the Changes in the Staging side now

1) update the CategoryTreeService, RepositoryTypeDimensionExporter, SchemaExporter with the below changes

indexingOutputConfig=/atg/commerce/search/ProductCatalogOutputConfig_staging

2)update the ProductCatalogSimpleIndexingAdmin to points to /atg/commerce/search/ProductCatalogOutputConfig_staging during indexing .

phaseToPrioritiesAndTasks=\
  PreIndexing=5:CategoryTreeService,\
  RepositoryExport=10:\
    SchemaExporter;\
    CategoryToDimensionOutputConfig_staging;\
    RepositoryTypeDimensionExporter;\
    /atg/commerce/search/ProductCatalogOutputConfig_staging,\
  EndecaIndexing=15:EndecaScriptService

That’s it you are done with the Staging Indexing workflow .So after this changes once you deploy the project indexing will be triggered in both staging and production.

For Indexing only in Production you can refer my previous posts.


Happy Day