Monday, 31 July 2017

Getting Started with Solr

Hi Friends my first post will be, Installing the Solr and  how to index the Sample File Given in the Examples.

Step:1
Download the Apache Solr Latest Version , I downloaded the Version 6.4.2

Step:2
Before Starting the Apache Solr make sure that you have the Java 1.8 or Higher Version.

Step:3
Start the Server using the Command solr.cmd start

once if the server is started then you can access by the url

http://localhost:8983/solr/#

once you start the server then you will get the below console 


Step:4 
In Solr the term core is used to refer to a single index, 

So before staring the search create the Core by the following way.


Navigate to the solr-6.2.0\bin folder in command prompt
And run the below command
solr create –c refrence


Step:5
Once the Server is started you have index the Examples by the below Method

<Solr-ExtractedPath>/

And Execute java -Dc=refrence -Dauto -jar example\exampledocs\post.jar -c .\docs
Once if you execute the above script it will index the files inside the docs.

Challenges :
bin/post exists currently only as a Unix shell script, however it delegates its work to a cross-platform capable Java program.  The SimplePostTool can be run directly in supported environments, including Windows. By the above Script.
Once you execute the above link SimplePostTool can be used to index .

Errors:
Execute the post command Directly you will get the below error.

'post' is not recognized as an internal or external command,
operable program or batch file.

So use the steps I have given to resolve


SimplePostTool version 5.0.0
Posting files to [base] url http://localhost:8983/solr/gettingstarted/update using content-type application/xml...
SimplePostTool: WARNING: No files or directories matching -c
SimplePostTool: WARNING: No files or directories matching refrence
POSTing file films.json to [base]
SimplePostTool: WARNING: Solr returned an error #404 (Not Found) for url: http://localhost:8983/solr/gettingstarted/update
SimplePostTool: WARNING: Response: <html>
<head>
<meta http-equiv="Content-Type" content="text/html;charset=utf-8"/>
<title>Error 404 Not Found</title>
</head>
<body><h2>HTTP ERROR 404</h2>
<p>Problem accessing /solr/gettingstarted/update. Reason:
<pre>    Not Found</pre></p>
</body>
</html>
SimplePostTool: WARNING: IOException while reading response: java.io.FileNotFoundException: http://localhost:8983/solr/gettingstarted/update
1 files indexed.
COMMITting Solr index changes to http://localhost:8983/solr/gettingstarted/update...
SimplePostTool: WARNING: Solr returned an error #404 (Not Found) for url: http://localhost:8983/solr/gettingstarted/update?commit=true
SimplePostTool: WARNING: Response: <html>
<head>
<meta http-equiv="Content-Type" content="text/html;charset=utf-8"/>
<title>Error 404 Not Found</title>
</head>
<body><h2>HTTP ERROR 404</h2>
<p>Problem accessing /solr/gettingstarted/update. Reason:
<pre>    Not Found</pre></p>
</body>
</html>
Time spent: 0:00:00.589

if the above error comes make sure that you are passing the Correct arguments .

java -Dc=refrence -Dauto -jar example\exampledocs\post.jar -c example\exampledocs

     Once if you do this it will index the Files as below


SimplePostTool version 5.0.0
Posting files to [base] url http://localhost:8983/solr/refrence/update...
Entering auto mode. File endings considered are xml,json,jsonl,csv,pdf,doc,docx,ppt,pptx,xls,xlsx,odt,odp,ods,ott,otp,ots,rtf,htm,html,txt,log
SimplePostTool: WARNING: No files or directories matching -c
Indexing directory example\exampledocs (19 files, depth=0)
POSTing file books.csv (text/csv) to [base]
POSTing file books.json (application/json) to [base]/json/docs
POSTing file gb18030-example.xml (application/xml) to [base]
POSTing file hd.xml (application/xml) to [base]
POSTing file ipod_other.xml (application/xml) to [base]
POSTing file ipod_video.xml (application/xml) to [base]
POSTing file manufacturers.xml (application/xml) to [base]
POSTing file mem.xml (application/xml) to [base]
POSTing file money.xml (application/xml) to [base]
POSTing file monitor.xml (application/xml) to [base]
POSTing file monitor2.xml (application/xml) to [base]
POSTing file more_books.jsonl (application/json) to [base]/json/docs
POSTing file mp500.xml (application/xml) to [base]
POSTing file sample.html (text/html) to [base]/extract
POSTing file sd500.xml (application/xml) to [base]
POSTing file solr-word.pdf (application/pdf) to [base]/extract
POSTing file solr.xml (application/xml) to [base]
POSTing file utf8-example.xml (application/xml) to [base]
POSTing file vidcard.xml (application/xml) to [base]
19 files indexed.
COMMITting Solr index changes to http://localhost:8983/solr/refrence/update...
Time spent: 0:00:12.995

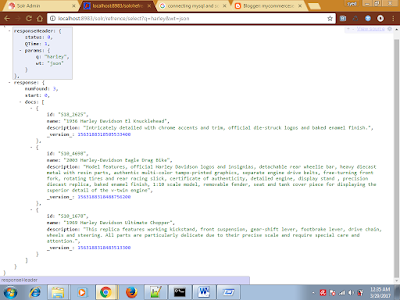
Once Indexing is done then you can access by the Followin url or search by the following url

Access:


Delta Updates in Solr

Hi Guys,
We have Learned the ways to do indexing from the mysql database those who missed can read from here, Now it’s the time to learn the Delta Imports in Solr .

edit db-data-config.xml from the conf folder ,

<?xml version="1.0" encoding="UTF-8" ?>
<dataConfig>
<dataSource type="JdbcDataSource"
            driver="com.mysql.jdbc.Driver"
            url="jdbc:mysql://localhost:3306/classicmodels"
            user="root"
            password="root"/>
<document name="classicmodels">
   <entity name="products" query="select * from products" deltaImportQuery="select * from products"
   deltaQuery="select * from products where last_modified > '${dataimporter.last_index_time}'">
     <field column="productCode" name="id"/>
     <field column="productName" name="name"/>
     <field column="productDescription" name="description"/>      
  </entity>
</document>
</dataConfig>

We have already dealt with the  query, now it’s the time to deal with the delta queries now introduce two queries .

deltaImportQuery :this query is used for the importing the data while performing the Delta import, make sure you include all the Fields in deltaImportQuery as like the full import query. If missed any fields solr will through the Run Time Exception.

deltaQuery : this is the query which identifies the Delta Changes . ${dataimporter.last_index_time} will give you te last index time.

Once this changes are done, then it’s the time to index the Delta changes.


Once you hit the above url , then delta import will be done and indexed. You can see the 

status of the delta update by the Following url.


So it’s the time to see the Delta Changes in the response. Happy Learning !!!!

Integrating Solr 6 with My Sql

Hi Readers,

Good Day, I was doing some couple of tasks for identifying Integration of solr with mysql, the strange part is that solr has changed its schema structure when compared to the older version of solr .I am Writing this tutorial for solr 6 , the output of this is to make the readers to connect to mysql and index and query for the Results .

 Pre-requisites
      
     MySql - any version
     MySql – JDBC Connector
     Sample DatBase Containing any data

Step:1

Create a Core in Solr called Refrence you can see my blog here.

Step:2

Once you create the Core then the Following folder will be Created in the Server
Ie <Solr Installed Dir>solr-6.4.2\server

Navigate to  <Solr Installed Dir>solr-6.4.2\server\solr\refrence

There will be two folders called conf and data created Default, if not create it.

Conf – this folder is used for the Defining the Configs for solr , example what to index and what should take as part of the query.

Data- this folder is used for the Indexing stuff.

Step:3

Edit the File solrconfig.xml  and if this file is not avalaible in the Conf Directory copy from some other examples of solr and paste it .
Add the Following handler in the request handler

  <requestHandler name="/dataimport" class="solr.DataImportHandler">
    <lst name="defaults">
      <str name="config">db-data-config.xml</str>
    </lst>
  </requestHandler>

By Defaut solr does not comes with the dataimport handler , you need to add it externally.

You also need to add the dependency jars in that xml.

<lib dir="${solr.install.dir:../../../..}/dist/" regex="solr-dataimporthandler-.*\.jar" />
<lib dir="="${solr.install.dir:../../../..}/contrib/dataimporthandler/lib" regex=".*\.jar" />

Make sure you copy the mysql jdbc jar in that path eg(cotrib /lib) , otherwise you can create a lib folder inside the refrence and paste the jar.

Step:4

As defined in the conig , you need to have the following file db-data-config.xml  in the conf directory.
Create a file called db-data-config.xml and edit with the below contents.

<?xml version="1.0" encoding="UTF-8" ?>
<dataConfig>
<dataSource type="JdbcDataSource"  driver="com.mysql.jdbc.Driver"  url="jdbc:mysql://localhost:3306/classicmodels"
            user="root"
            password="root"/>
<document name="classicmodels">
   <entity name="products" query="select * from products">
     <field column="productCode" name="id"/>
     <field column="productName" name="name"/>
     <field column="productDescription" name="description"/>      
  </entity>
</document>
</dataConfig>

This config file has the cofigurations for the Database I hope you are familiar with the Database Connections  for mysql

Document name is the DataBase Name .
Entity name is the Table Name.
Query is how to fetch the Data From the Table.
Name is the identification in the Solr.

Once you create mapping and changes done , save it and you need to define this fields , this is the place where the mapping of the database names is done with the field names .
This Steps Differs from the Previous versions of the Solr.

Step:5

You have to declare these Fields to the solr , how you can do it ?
Navigate to managed-schema   File in <SOLR-INSTALLED_DIR>\solr-6.4.2\server\solr\refrence\conf

Check for the field name tag and declare your defined fields also here.

    <field name="id" type="string" indexed="true" stored="true" required="true" multiValued="false" />

    <field name="name" type="string" indexed="true" stored="true" required="true" multiValued="false" />
    
    <field name="description" type="string" indexed="true" stored="true" required="true" multiValued="false" />

Once you declare here, then solr understands your Fields .

then you need to copy your fields or link your fields as like below


    <copyField source="id" dest="refrence"/>
    <copyField source="name" dest="refrence"/>
    <copyField source="description" dest="refrence"/> 

where refrence can be defined as below 

    <field name="refrence" type="text_general" indexed="true" stored="false" multiValued="true"/>

it is of type "text_general" you can use this filed type for copying of the fields 

Step:6

Now we have declared the Fields, we have to define the default Fields to be searched .

We can achieve by two ways, one by defining in the solrconfig and other is by passing through the query.

We can see how to define in the solrconfig.xml

Navigate to solrconfig.xml in conf directory and search for the request handler select and add the following fields to it like below

<requestHandler name="/select" class="solr.SearchHandler">
     <lst name="defaults">
       <str name="echoParams">explicit</str>
       <int name="rows">10</int>
                   <str name="df">refrence</str>
     </lst>
</ requestHandler>
Once if you define like this, it will be treated as the search fields and no need to define in the URL.

Step:7 you need to import and index the Data.

Restart the solr server after the changes in the above Files .

Step:8

Once if you do this , it will import and index it.

You can see this by the below

this gives the details about the processed skipped etc

Step:9

Now this Is the time to query for the Data you have Fetched and Indexed.


this will give the below response

Once if you see the below response, congragulations you have connected your database and indexed it as per your requirement .

Happy Learning . Stay Tuned for more solr Tutorials .

Saturday, 29 July 2017

Logging in weblogic

Hi guys today I am going to share an interesting topic on weblogic server start up flags.which will be used for atg or any other server start up.
Most of us will configure the weblogic in local and start and stop server through the command prompt will not cause any issue on the logging.  Where else some part of the people especially people working on the build and deployment and those who responsible for the configuration of the servers will face this issue .
The issue is logging the logs in to the out file and because of the gc threads running across, for this I have found the solution and delighted to share with you as well .
Before pitching into that , weblogic gives us the provision where we can  configure the server from the console , after configuring it also gives us the way to define the server start up arguments ,memory and jvm options .
So what ever I am describing below can be configured from the console  of weblogic java arguments or from the start up script in the java_options variable .
$java_options= “xxxxx”
Export $java_options
1)Server logging .
By default the logging will not be redirected to the out file , you have to mention it explicitly , if you are not mentioning it then weblogic will not be knowing where to write the output ie it can be error , logging,debugging or the info. Just configure the below and see the file during the start up and after it will be writing to it.
-Dweblogic.Stdout=/data/logs/weblogic/dev1a.out
-Dweblogic.Stderr=/data/logs/weblogic/dev1a.out
2) java memory .
Once if you define like the below memory will be allocated for the server instances.
Xms4096m -Xmx4096m -XX:NewSize=1024m -XX:MaxNewSize=1024m -XX:PermSize=512m -XX:MaxPermSize=512m
3)gc threading.
By default in Linux gc thread will be writing the logs all the time.  When you define like below It will disable and give the clean log , of the server.
XX:+DisableExplicitGC -XX:+UseConcMarkSweepGC -XX:ParallelGCThreads=4
If you find any difficulties please raise to me . so I can  develop my post further.
Happy learning.!!!!

Wednesday, 12 July 2017

CredentialStoreManager Credentials Storage

Hi All ,
      We are going to see about the Component

/atg/dynamo/security/opss/csf/CredentialStoreManager

This class makes the calls that store and retrieve credentials from the credential store. Uses the map, key and credential properties parameters. It initiates JPS, retrieves the credential store and stores credentials in the store. Also used to delete credentials from the credential store..

When Indexing is triggered from the Dyn/admin Starting from 11.2 made mandatory to Store the Workbench Password and authenticate it before Indexing .

For Configuring the Credential you can refer my previous post here .

When you look at the above Component there is JPSConfigurationLocation is defined to it .It has the path for the jps-config.xml file . If you are pointing to the file same file created in the early stages of app creation update it with the path. If you are not pointing to it then create the Credentials again and give the same value of workbench.and save it . Once if you create it , will be stored to the {atg.dynamo.home}/security/jps-config.xml following location. so going forward it will take and from read the credentials from this location unless we are not deleting it .

In Places, where we are not installing and deploy only the Big Ear , we also need to create as a one step process . Make sure that the same location is referenced  all the time when changing the Ear. In my case the File is read from the following location.File C:\ATG\ATG11.3\home\security\jps-config.xml.

If you also face some error with the Creation of the Credential store you can refer my previous posts.

[MDEX] Failed to parse URL

Hi All,
       Most of us Face the issue relating to the MDEX very often. The Best way to Debug and Solve is to take the Url and paste it to the Browser and give the format=xml or json, once if you give like above you can able to identify which is the Missing Property . Usually this happens if the non index property is added as part of the Query and indulged in the operations like sorting or Filtering .

But Some Scenarios you have no clue of Identifying which property went wrong . It will take time to identify this.

Error:[MDEX] Failed to parse URL: '/graph?node=0&select=promoId&merchrulefilter=endeca.internal.nonexistent&groupby=promoId&offset=0&nbins=10&allbins=1&attrs=All|oil|mode+matchallpartial&autophrase=1&autophrasedwim=1&log=reqcom=NavigationRequest&sid=HCGcWoz2-aE_ncnZIJD0G89_UmEHFCiG10-NHa1we6pp9s8773_l%21-695473435%211497272464980&rid=270&irversion=652'

It will not give the exact property Where it gets failed . In the above url promoId Went wrong. When i check the Url it was not clear and check later promoID is the Rollup and none of the Rollup is set as part of the indexing . I fixed this by Setting the Index Config back again and triggering indexing.

Tuesday, 11 July 2017

Same Dimension Value Across all the Environments

Hi All,
    Most of us , When having more Environments will face issues regarding the Dimension Values Generation. I Have Faced a lot , though am not hard-coding the Dimension Values, faced issues relating to recreating the refinements  if any Dimension Change occur . Now we are going to see how to Handle this .

When you have Indexing Successful in any environment, then Import its Dimension Values Using Below Command / Script

When the App is Created using the CRS Deployment Template, go to the Location /opt/endeca/apps/ATGen/test_data/ You Will Find a file called initial_dval_id_mappings.csv
Delete it and Proceed to Execte the Command, this Command has to be Executed from the CAS bin.

sh cas-cmd.sh exportDimensionValueIdMappings -m appName-dimension-value-id-manager -f /opt/endeca/apps/ATGen/test_data/initial_dval_id_mappings.csv 

Don't Forget to Create the Output File with the Following name initial_dval_id_mappings.csv , if you are Changing it you have to Change in the Script as well . It is better to use the Same .

Once this File is Created Check it out , you will have all the Dimensions Indexed as part of your Indexing. This File Has to be Moved Across all the Environment and Initialize_services.sh has to be called for the First Time. Once it is Called Going Forward all the Dimension values will remain same as the Lower Environment .

initial_dval_id_mappings.csv this file  will be called as part of the InitialSetup during the Initialize_Services.sh .

<script id="InitialSetup">
<bean-shell-script>
<![CDATA[
IFCR.provisionSite();
CAS.importDimensionValueIdMappings("TAen-dimension-value-id-manager",
InitialSetup.getWorkingDir() + "/test_data/initial_dval_id_mappings.csv");
]]>
</bean-shell-script>
</script>

Apart from this Approach we can also do the ImportDimensionValueIdMappings Script. Using the File Will make the Dimension Value not to Change for the Longer Run.


Sunday, 9 July 2017

Config Repository Error

Hi All,
   Today , I was facing some Strange Error in Production, Which is causing the Indexing not to be succeed and it is failing . We analysed the issue.

Caused by: com.endeca.soleng.eac.toolkit.exception.CasCommunicationException: Error Starting baseline crawl 'ATGen-last-mile-crawl'.Unable to login to config repository site for user "admin", status code: 401, Response:

ROOT CAUSE:
It seems to be config repository password got changed and it is unable to login in to it, during Indexing .


IDENTIFICATION:

We tried Many approaches Starting From Creating the Config Password and Changing it in the Credential Store Manager , which seems to be the Wrong Solution.

SOLUTION:
After Struggling for the hours together , we came in to the Solution of Deleting the Config Repository and Recreating it . Which is the Correct Solution and Worked also.

WARNING:
When you are deleting the Config Repository, we should be Aware that we are not Performing it , When the Site is Live or Busy, because Recreating the Crawl will change the Dimensions Id, Which will not have any impact if it was having Dimensions id Imported.If not all the Dimensions will change you will be having the Tough Time .  

This Issue was identified Often in Endeca 11.2 , not sure why it is exactly happening can fix this as of now with the above Solution . Happy Tricking !!!


Sunday, 7 May 2017

Whats new in Oracle Commerce 11.3

Hi All,
    Oracle's new commerce release has given answer to the queries, what is the next version of Commerce, how they are going to proceed with the UpComing Platforms, what are the Features .

Yes the Newer version of the Oracle commerce Platform has been released its 11.3 , looking in to it , oracle going to be the veteran in the commerce platform. I am one among the Followers of the oracle commerce versions regularly, this time oracle has concentrated more on the Business Standards and implemented new technologies for the faster access of their Tools and industry Standards.

Oracle Commerce is also certified to run on Oracle’s public cloud infrastructure, using Compute and database cloud service. This helps commerce owner’s additional flexibility to deploy and operated oracle commerce.

We can see the Changes with respect to this version below

Installation

As per the Oracle official docs this version going to be a Major version, which means full installation is required for this version.

Oracle Commerce Platform

This version of Oracle commerce has many new changes with respect to the Rest Framework, This latest framework allows the user simplification in  interaction with the platform .It uses the Jersey as underlying implementation .It is JAXRS 2.0  compliant Framework. It gives importance for the API Versioning, locking, transitions, caching, localization, filtering , resource version tracking ,exception mapping, relation registry, self-documentation (via Swagger) and asynchronous endpoints . It allows easily adoption for the developers who don’t know Oracle commerce.

Family resemblance between Oracle Commerce and other Oracle CX applications making it simpler to code to multiple Oracle Commerce CX suite applications.  Design Pattern Based Approach for Rest Interfaces.

It is already Coming up with the some of the Rest out of box services , which allows for faster development and Extensibility.

BCC

Purge Tool is used for the purging old versions of the CA versioned repositories. It has Changes in the Memory Efficiency, when compared to the earlier versions of the Commerce Performing export of larger catalog update with lesser amount of time and lesser memory in use.  The Queries executing the versioned repositories are improved.

Many of the people have faced delay of loading the BCC in their Machines earlier, Oracle Uses the Flex and which is being replaced by the (JET) Oracle javascript Extension Toolkit. Which makes faster for the Users to access and UI is with the Industry Standards. The BCC’s Targeting and Segmentation UI, previously implemented in JavaServer Pages (JSP), has been rewritten in Oracle JET

Oracle commerce Guided Search

MDEX

All of you have wondered , why the Oracle commerce Guided Search has Difference Versions eg MDEX 6.5.2 and other components are 11.2 and so, this has been changed in this version to 11.3 Mdex also comes with the same version in this release.

It provides the enhanced TypeAhead functionality . OLT is needed to be exists in the MDEX which has been lifted and Multiple OLT can exists in the same mdex. Restful Apis has been introduced.

Experience Manager

As like BCC, the Experience Manager UI is also redesigned with the Oracle JET , which allows for the faster access  and Industry standards. New SDK with respect to the Experience Manager which allows for the Extensibility.

Earlier Versions the cartridges were developed only with the XML files , which has been replaced with the JSON. But Still users can Import their Existing XML and Convert them to the JSON based Templates, this was introduced for Better Memory optimization. Apart from these changes some new UI changes are also brought In place.

Rule manager was removed in this version and customers who are using this have to move to the Experience Manager.   


I was excited in Reading this Cool new features introduced by oracle. The detailed information about installation, configuration and migration can be seen in the upcoming Topics . Hope you enjoyed reading it . Subscribe for the newer Topics .

Saturday, 6 May 2017

Input Record Does not have a valid Id

Hi All, Today I was Facing some weird Exception , I didn’t understand at the First then I started understanding that the Exception was due to the Deployment Template, below is the trace of the Exception.

ERROR /atg/search/repository/BulkLoader -
atg.repository.search.indexing.IndexingException: Error sending record atg.endeca.index.record.Record@c28a71bd

Root cause: Input record does not have a valid Id. at atg.endeca.index.RecordStoreDocumentSubmitterSessionImpl.submitRecord(RecordStoreDocumentSubmitterSessionImpl.java:436) at atg.endeca.index.RecordSubmitterSessionImpl.submitDocument(RecordSubmitterSessionImpl.java:240) at atg.endeca.index.AbstractRecordStoreAggregateSession.submitDocument(AbstractRecordStoreAggregateSession.java:357) at atg.repository.search.indexing.LoaderImpl.outputAndSubmitDocument(LoaderImpl.java:1167)


This Happened Because, I was using the CRS Deployment Template to create the app, as part of the Migration, and we have created the app using the Discover Deployment Template. Discover uses common.id and CRS uses the record.id as the common identifier for the record.

Solution is to Change the app back to the CRS this issue will be resolved. 

Saturday, 8 April 2017

What’s new in Oracle Commerce Guided Search 11.2

Hi Followers,

When I say, I am working on the ATG migration; first question all will ask is that what is new in it. I though this will be the best forum to share what’s new in it. I described the content in very shorter way, that all can understand quickly. I have shared some important features in ATG as well.

Index Partitioning

The Oracle Commerce multisite framework allows merchants to run multiple different web sites on the same instance of Commerce; hence the indexing is also improved to support this feature. The Main Changes that were brought in oracle commerce guided search 11.2 is that, it allows for the configuration of how site data is partitioned into search indexes. Administrators can select which sites’ data will be indexed in which index, thus allowing the data to be partitioned across multiple MDEX indexes

Unified Reporting

Reporting features has been improved, from the Guided Search product with reporting from the Commerce Platform. This allows analysis of the data such as top search terms by site, by segment, or even by items purchased.
Out of the box, reports are provided to help give valuable insight into customer activity with Search. These include key analysis such as top search terms, search terms with zero results, search terms that led to the most sales, and most used facet values. Where the out of the box reports do not meet a particular need, Oracle Business Intelligence’s powerful capabilities may be used to create custom reports, ad-hoc queries, and bespoke dashboards.

Language Support

Language support is improved by adding the new languages and improving the search results and customer experience.
It supports the following languages, so totally 50 languages are supported in it.


Oracle Commerce Workbench


Experience Manager Projects

Experience Manager Capabilities has been improved a lot in this version, for example the Experience Manager has been released same like BCC with the Assets Flow.  The Experience manager allows multiple users can work on the project parallel same like the BCC. If the Conflict happened then it cannot be modified by the other user and he will be notified. A simple prebuilt approval process that allows users to make changes and commit them is being introduced. It provides the visibility to changes done before committing.

Interactive editing can be done in preview actively, without having to switch between preview and data view. A new Manifest pane provides details of the various page elements. Users can edit page elements from the Manifest pane and see the effect of their changes on the preview page.ie WYSIWYG editing mode. Business users can now also set up different form factors for different types of devices (desktop, tablet, mobile, etc.) that will allow them to preview the same page for different devices.

Site Specific Keyword Redirects

The Workbench keyword redirect tool has been enhanced in 11.2, allowing business users to add keyword redirects that are specific to a given site in a multi-site environment. IT users can add a keyword redirects group and associate the group to a specific site, allowing business users to manage keyword redirects at the site level by working with the group. A default keyword redirects group ships with the product, while additional ones can be created and assigned to other sites.
Administrators can restrict access permissions for these groups so that only certain users can add keyword redirects to a certain site.

Some Important Features in oracle commerce 11.2

To better achieve goal of Omni Channel Experience, Commerce 11.2 adds significant new capabilities to support omni-channel commerce. The new Commerce Store Accelerator (CSA) reference application provides a responsive, modern, up to date starter store to assist merchants in creating their storefront and support desktop, tablet and mobile devices.

BCC

Commerce 11.0 and 11.1 added new content management capabilities to the Commerce platform and version 11.2 continues with new functionality in this area. Media files can now be directly uploaded within the BCC and stored on the Commerce servers, without the need for external systems. With the prior investments and the new 11.2 features, more and more merchants will be able to manage all their content and commerce in a single application, Oracle Commerce

Pricing

The pricing engine has also been updated to allow prices to vary by time. This allows business users to set up multiple prices ahead of time, with the appropriate start and end times. While this is valuable for managing day to day price changes, it also makes supporting various pricing strategies such as flash sales, simpler and easier to manage.

For ATG 11.2 Migration Read my previous blog here. For Endeca Migration Read my blog here .


Happy Learning !!!! 

Friday, 7 April 2017

Timezone Region not found Exception in Weblogic

Hi Readers,

Good Day!! Today we are going to see not the technical, but some strange Exception which I faced while upgrading my web logic to 12.1.3, though the exception looks simple, Identifying and rectifying this issue will be challenging. If any of this readers face same exception it is enough you follow only this, will work exactly.

This error exactly will be caused, when configuring the Data Sources in Weblogic . We used to configure the weblogic datasources by configuring the JNDI name,Driver Name, username and password after the configuration if we try to do TestConfiguration then will get the below error

Message icon - Error Connection test failed.
Message icon - Error ORA-00604: error occurred at recursive SQL level 1 ORA-01882: timezone region not found <br/>oracle.jdbc.driver.T4CTTIoer.processError(T4CTTIoer.java:450)<br/>oracle.jdbc.driver.T4CTTIoer.processError(T4CTTIoer.java:392)<br/>oracle.jdbc.driver.T4CTTIoer.processError(T4CTTIoer.java:385)<br/>oracle.jdbc.driver.T4CTTIfun.processError(T4CTTIfun.java:1018)<br/>oracle.jdbc.driver.T4CTTIoauthenticate.processError(T4CTTIoauthenticate.java:501)<br/>oracle.jdbc.driver.T4CTTIfun.receive(T4CTTIfun.java:522)<br/>oracle.jdbc.driver.T4CTTIfun.doRPC(T4CTTIfun.java:257)<br/>oracle.jdbc.driver.T4CTTIoauthenticate.doOAUTH(T4CTTIoauthenticate.java:437)<br/>oracle.jdbc.driver.T4CTTIoauthenticate.doOAUTH(T4CTTIoauthenticate.java:954)<br/>oracle.jdbc.driver.T4CConnection.logon(T4CConnection.java:639)<br/>oracle.jdbc.driver.PhysicalConnection.connect(PhysicalConnection.java:666)<br/>oracle.jdbc.driver.T4CDriverExtension.getConnection(T4CDriverExtension.java:32)<br/>oracle.jdbc.driver.OracleDriver.connect(OracleDriver.java:566)<br/>oracle.jdbc.pool.OracleDataSource.getPhysicalConnection(OracleDataSource.java:317)<br/>oracle.jdbc.xa.client.OracleXADataSource.getPooledConnection(OracleXADataSource.java:486)<br/>oracle.jdbc.xa.client.OracleXADataSource.getXAConnection(OracleXADataSource.java:174)<br/>oracle.jdbc.xa.client.OracleXADataSource.getXAConnection(OracleXADataSource.java:109)<br/>weblogic.jdbc.common.internal.DataSourceUtil.testConnection0(DataSourceUtil.java:356)<br/>weblogic.jdbc.common.internal.DataSourceUtil.access$000(DataSourceUtil.java:22)<br/>weblogic.jdbc.common.internal.DataSourceUtil$1.run(DataSourceUtil.java:254)<br/>...

If you encounter this type of exception, then you have to follow below steps

Navigate to <WEBLOGIC-INSTALLED DIR>\user_projects\domains\<YOUR-DOMAIN>\bin then 

open the file named setDomainEnv.cmd 

Search for the Property called JAVA_PROPERTIES ad update that property with  the below values

JAVA_PROPERTIES="-Dwls.home=${WLS_HOME} -Dweblogic.home=${WLS_HOME} -Duser.timezone="GMT""

That means you are defining the Time zone which is not defined.  I am defining the GMT because it’s my Time Zone.

After the Changes, you can restart the Managed server then try configuring the Data Source now, you will not face this exception again. That’s it you are done.

Happy Time Saving !!!!!