Showing posts with label Installation. Show all posts

Thursday 23 March 2017

Endeca 11.2 Migration

Hi Friends ,
Today we are going to see some interesting topic about migrating Endeca to 11.2 version , which consists of some interesting steps which you have not done Earlier .This Tutorial aims to be describing the step by step approach to be followed.

Before Start executing these tutorials, I would recommend to read my earlier blog regarding the ATG migration, which may be interesting to follow up.

Step1:

App Migration:

I would recommend you to compare 11.1 and 11.2 app structures and move the newly changed files to 11.1 app structures, use software’s like beyond compare for this comparison. When you don’t have earlier 11.1 project specific app structure then you can go head and creating the app from the crs deployment template of 11.2, for application creation you can refer my blog here.

In the App level some of the legacy import has been replaced. The content has been identified with the json files

Eg

Make sure the following file is avalaible in the Folder C:\Endeca\Apps\ATGen\control\..\config\import
_@@PROJECT_NAME@@.json

{"ecr:type": "site"}
Some of the Scripts for execution has been removed completely, when you do a compare you will come to know.

Step:2

After the Installation login to the workbench http://localhost:8006/
When you are logging for the first time, 11.2 feature asks you to change the password change it make sure you are using the unique password, this password has to be registered in to the Endeca and ATG Side so remember it .

Step:3

Initialize the Application from control directory of the application. When you do initialization you will face the below issue while provisioning the site to IFCR .

[07.22.16 15:09:46] SEVERE: Unauthorized (401): Unauthorized access to workbench. Please check your credentials in WorkbenchConfig.xml/OCS. If problem still persists, please contact your administrator.
Occurred while executing line 3 of valid BeanShell script:
[[

1|
2|      
3|    IFCR.provisionSite();
4|    CAS.importDimensionValueIdMappings("Discover-dimension-value-id-manager",
5|         InitialSetup.getWorkingDir() + "/test_data/initial_dval_id_mappings.csv");
6|     

]]

[07.22.16 15:09:46] SEVERE: Caught an exception while invoking method 'run' on object 'InitialSetup'. Releasing locks.

Caused by java.lang.reflect.InvocationTargetException
sun.reflect.NativeMethodAccessorImpl invoke0 - null
Caused by com.endeca.soleng.eac.toolkit.exception.AppControlException
com.endeca.soleng.eac.toolkit.script.Script runBeanShellScript - Error executing valid BeanShell script.
Caused by com.endeca.soleng.eac.toolkit.utility.IFCRUtility$HttpStatusException
com.endeca.soleng.eac.toolkit.utility.IFCRUtility execute - Unauthorized (401): Unauthorized access to workbench. Please check your credentials in WorkbenchConfig.xml/OCS. If problem still persists, please contact your administrator.

Failure to initialize EAC application.

The Solution for this is go to Tools and Frameworks Directory and go to credential store directory and execute the below command

manage_credentials.bat add --config ..\..\server\workspace\credential_store\jps-config.xml --mapName endecaToolsAndFrameworks --user admin --key ifcr --type password


don’t forget to give the –config of you are not giving the Config then it will not update the Password in jps-config.xml

it will ask for the username and password give the username as admin and password as same password which you changed for the workbench.  It will prompt that key already exists do you want to update give yes for it .


Step:4

Change this config repository password in cas also.
C:\Endeca\Apps\ATGen\config\cas\last-mile-crawl.xml
After you changed , do initializeservices this time it will initialize without errors .

Step:5

You are set when you want to trigger indexing from dyn admin you need to perform more operations


Other wise you will face com.endeca.repository.importer.ImporterException: Unable to connect to config repository on localhost.localdomain:8006 with user admin, Response:HTTP/1.1 401 Unauthorized
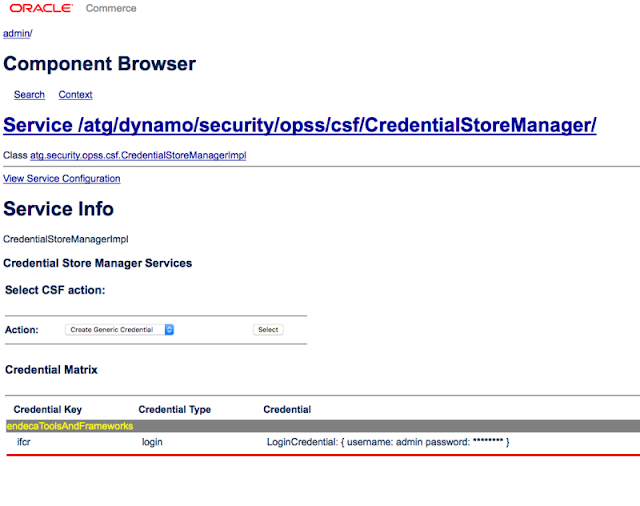

Solution:

Go to the component

http://localhost:8015/dyn/admin/nucleus//atg/dynamo/security/opss/csf/CredentialStoreMana
ger/
select
CreateLogin CredentialStoreManager

And click select if it is givin error like below java.security.AccessControlException: Access Denied

Then go to the C:\Java\jdk1.8.0_21\jre\lib and open the file java.policy and  add the following line in to the grant option.

permission java.security.AllPermission;

after this changes then again restart the server and go to the component CredentialStoreManager

do the same

CreateLogin CredentialStoreManager/
credental key ifcr
credential type login
username
password
here username and password is the same as you have given earlier  . once if you give it all , it will be highlighted in yellow which states your changes has picked .


So now you are done with the Endeca Changes now from java changes.


Endeca 11.2 Java changes

Class Named NavigationStateProcessor has changed it’s below method

public void process (NavigationState pNavigationState)

to

public NavigationState process (NavigationState pNavigationState)

So Congratulations for migrating to 11.2 .


Monday 20 March 2017

ATG 11.2 Migration

Hi Readers, Most of us when Migrating from one version to another will have a lot Questions in their Mind. How to Start with and what are the things to be considered While Migrating to the Newer Version, so in this Tutorial I am going to list down some of the Common Approaches to be followed while Migration.

Step:1

The First and Foremost thing you have to do is Download the guide named  Oracle Commerce Platform 11.2 Migration Documentation. This will give you certain approaches like CIM installation and Manual installations.

Step:2

In the Same Oracle Commerce Platform 11.2 Migration Documentation Directory you will find the Patches to be Download from the Oracle Support Site , Download it.

Step:3

Once You Download the Patch, for 11.2 there are two types of the Patch for DB Scripts available, one for ATG and another for CSC . Endeca Changes also comes as part of the ATG.

Separate the Scripts based on the CAT, CORE, PUB,AGENT ,

How you can identify the Scripts belong to which schema is?

Identify the Scripts in the Alter Table Execute in the Previous Schemas and Identify, and all the Scripts given in the Versioned Folder should be Separated and  executed only in the PUB Schema . There are no Official details about the table execution in the Schema.  
Do the View Mapping Changes for the BCC and CSC.

Step:4

Once you are done with the Scripts Migration execute the Above In the respective Schema. Replace the Env variables In the Machine and Eclipse. So that it is pointing to the 11.2 Jars.

Step: 5

Do the Compilation Changes and Deploy Ear.  Follow the Migration Guide to Change the Java Specific Changes.

Step :6

Solve the Server Startup issues. Once it is Finished You are done!!!!

Endeca Migation Can be dealt in seperate Blog post. If You are Interested to migrate using CIM , it as good as the Command Prompt Selection. View Mapping Scripts are Executed in the Dynamo admin of the BCC.

Sunday 16 October 2016

Initialize services in endeca

Once the App is created as per the Deployment Template of the CRS or the Discover Application, Then the First Step of the Endeca is done.

Step two of the Endeca app creation is to make initialize, it means nothing but promoting or making it used with the ATG application. While Running Initialize services there are many actions are created. Following are some of the Actions are happened.
                                                                                                                                                               
  1. Removal of Existing Record stores.
  2. If the Record stores are not existed then new record stores are created.
  3. Clusters are initialized.
  4. Checking the XM Authentication to Promote the content to IFCR.
  5. Importing the Content to the IFCR from the Content Folder of the App.
  6. Starting the log servers.
  7. Setting the Indexes config  from the Index-config.xml file.


Steps to Initialize the Application.

Step :1

Navigate to <EndecaApp>/ATGen/control/


Step 2:

Open CMD and type initialize_services.bat

If it is Throwing the Error Record stores already Exisitng then use  initialize_services.bat --force


For Overriding the Existing Record stores.

Thursday 22 September 2016

Enabling automatic Indexing in Endeca


Enabling Remote Indexing
To enable remote indexing, modify the configuration of the SynchronizationInvoker component on the ATG Content Administration Machine,so that it points to a SynchronizationInvoker component on the remote system, and configure the remote SynchronizationInvoker to point to aLocalSynchronizationInvoker on the remote system:


Below is the Component in BCC machine

/atg/search/SynchronizationInvoker.properties

localSynchronizationInvoker^=/Constants.null
port=3074
host=beta.auxprod.com

Where host is the remote machine where indexing has to be triggerd. Port is the RMI port of the Remote Machine where Indexing has to be triggered.

On the remote system, ensure that the SynchronizationInvoker.localSynchronizationInvoker property is set to null


Below is the component in the Auxillary Machine point the Component to the Same Machine with respect to the Synchronizationinvoker

/atg/search/SynchronizationInvoker.properties

port=3074
host=beta.auxprod.com


Thursday 8 September 2016

Starting Endeca Services 11.1 & Installation

For making Endeca to run in your machine you need Services up on Running.


1)MDEX

Version : 6.5.1

Installing Mdex Engines has the Components

1)Digix
2)Dgraph

dgidx is the indexing program that reads the tagged records that were prepared by Forge and creates the proprietary indexes for the MDEX Engine.

The dgraph is the name of the process for the MDEX Engine. A typical Guide Search application includes one or more dgraphs.


This Can be delt in detail during the Upcoming Blogs.

2)PlatformServices

Version 11.1.0

Installation Includes the Following Components in PlatformServices

The Endeca Platform Services package consists of a number of components that are used to build Endeca applications in support of the Endeca MDEX Engine. Two of the major components of the Endeca Platform Services package are the Endeca

1)Information TransformationLayer (whichincludes Forgeandother Data Foundry components)
2)Endeca Application Controller (EAC).

The EAC components consist of the EAC Central Server (which coordinates the command, control, and monitoring of all Agents in an Endeca Application Controller (EAC) Endeca implementation), the EAC Agent (which controls the work of an Endeca implementation on a single host machine) and the EAC command-line utility, eaccmd.


Installation is as good as any Application in Windows/linux

After installing Starting Services, needs the Following Environment Variable needs to be set.

ENDECA_ROOT

C:\Endeca\PlatformServices\11.1.0

ENDECA_CONF

C:\Endeca\PlatformServices\workspace

Windows

In Windows you can install as the Windows Service, that is started automatically.In some cases if you are unable to start the Service or administrator previlages still you can start using from the Below Location.

Go to C:\Endeca\PlatformServices\11.1.0\tools\server\bin then Start the Command startup.bat

It will be started.

Linux

Go to /opt/Endeca/PlatformServices/11.1.0/tools/server/bin then Start the Command startup.sh


3)Tools and FrameWorks.

Version 11.1.0

Oracle Endeca Tools and Frameworks enable the dynamic presentation of content across all channels. Deployments that use Oracle Endeca Experience Manager require the Tools and Frameworks package for Oracle Endeca Commerce with Experience Manager.

Deployments that do not include Experience Manager require the Tools and Frameworks package for Oracle Endeca Commerce with Guided Search. Both versions of the package include the following:
• Oracle Endeca Workbench, a tools suite that enables merchandising, Content Spotlighting, and search configuration for cross-channel applications
• The Endeca Assembler, an API for controlling the presentation of commerce sites and collecting usage information across all channels
 • The Endeca Tools Service
• The Endeca Deployment Template, a collection of operational components that provides a starting point for developing and deploying Endeca applications.
 • The Discover Electronics reference application

Starting the Tools and FrameWork Services.

Before you Start the Following Environmental variables has to be set.

ENDECA_TOOLS_ROOT

C:\Endeca\ToolsAndFrameworks\11.1.0

ENDECA_TOOLS_CONF

C:\Endeca\ToolsAndFrameworks\11.1.0\server\workspace


then Go to

Windows

In Windows you can install as the Windows Service, that is started automatically.In some cases if you are unable to start the Service or administrator previlages still you can start using from the Below Location.

C:\Endeca\ToolsAndFrameworks\11.1.0\server\bin>run.bat

Linux

/opt/Endeca/ToolsAndFrameworks/11.1.0/server/bin>run.sh


 4)CAS

Version :11.1.0


The Endeca Content Acquisition System is a set of components that add, configure, and crawl data sources for use in an Endeca application. Data sources include file systems, Content Management System crawls, Web servers, and custom data sources. The Endeca Content Acquisition System crawls data sources, converts documents and files to Endeca records and processes them for use in an MDEX Engine.


Starting CAS services.

Windows

In Windows you can install as the Windows Service, that is started automatically.In some cases if you are unable to start the Service or administrator previlages still you can start using from the Below Location.

go to C:\Endeca\CAS\11.1.0\bin>cas-service.bat

Linux

go to /opt/Endeca/CAS/11.1.0/bin>cas-service.sh


For more information you can refer here @

http://searchendeca.blogspot.in/2015/12/basics-of-eac-application.html

Endeca Modules


Following Modules are required to make Endeca Working.

DCS.Endeca.Assembler
DCS.Endeca.Index.SKUIndexing
DAF.Endeca.Index
DAF.Endeca.Assembler
ContentMgmt.Endeca.Index


Endeca Cluster Setup

Endeca Gives Very Easy Way by Which we can configure the Cluster, So that it may be updating Multiple Dgraphs When Indexing is Happening Successful.

I am Going to Setup the Endeca With 4 Dgraphs ( DgraphA1,DgraphA2 ) in One machine.
(Dgraph B1,Dgraph B2) in another machine. (ADgraph) in another machine.


Go to C:\Endeca\Apps\ATGen\config\script

open file AuthoringDgraphCluster.xml

Edit with ADgraph Host name and EAC port.


<!--
  ########################################################################
  # Authoring MDEX Hosts - The machines used to host all MDEX processes
  # for the 'authoring environment' MDEX cluster.
  #
 -->
 <host id="AuthoringMDEXHost" hostName="@@HOST@@" port="@@EAC_PORT@@" />  


For DgraphA1 and DgraphA2

Setting Go to 

LiveDgraphCluster.xml

by Default it is Commented other than one DgraphA1.

Edit the following with the Host Names of the Machine and  port Where EAC is running, endeca is installed as Cluster.

<!--
  ########################################################################
  # Live MDEX Hosts - The machines used to host all MDEX processes
  # for the 'live environment' MDEX cluster.
  #
 -->
 <host id="LiveMDEXHostA" hostName="@@DGRAPH_HOST1@@" port="@@EAC_PORT@@" />
 <host id="LiveMDEXHostB" hostName="@@DGRAPH_HOST2@@" port="@@EAC_PORT@@" />
 <!--
 <host id="LiveMDEXHostB" hostName="TODO" port="@@EAC_PORT@@" />
 -->

Comment out the Following.

<!--
  ########################################################################
  # Live Dgraph Cluster - The 'live environment' MDEX cluster.
  #
  -->
  <dgraph-cluster id="LiveDgraphCluster" getDataInParallel="true" enabled="true" configSnapshotDir="./data/dgraphcluster/LiveDgraphCluster/config_snapshots">
  <dgraph ref="DgraphA1" />
  <dgraph ref="DgraphA2" />
  <dgraph ref="DgraphB1" />
  <dgraph ref="DgraphB2" />
  </dgraph-cluster>

Comment out the Following.

<!--
  ########################################################################
  # Live Dgraph Process Definitions
  #
  -->
  <dgraph id="DgraphA1" host-id="LiveMDEXHostA" port="@@DGRAPH_1_PORT@@"
  post-startup-script="LiveDgraphPostStartup">
  <properties>
  <property name="restartGroup" value="1" />
  <property name="DgraphContentGroup" value="Live" />
  </properties>
  <log-dir>./logs/dgraphs/DgraphA1</log-dir>
  <input-dir>./data/dgraphs/DgraphA1/dgraph_input</input-dir>
  <update-dir>./data/dgraphs/DgraphA1/dgraph_input/updates</update-dir>
  </dgraph>
  <dgraph id="DgraphA2" host-id="LiveMDEXHostA" port="@@DGRAPH_2_PORT@@"
  post-startup-script="LiveDgraphPostStartup">
  <properties>
  <property name="restartGroup" value="2" />
  <property name="DgraphContentGroup" value="Live" />
  </properties>
  <log-dir>./logs/dgraphs/DgraphA2</log-dir>
  <input-dir>./data/dgraphs/DgraphA2/dgraph_input</input-dir>
  <update-dir>./data/dgraphs/DgraphA2/dgraph_input/updates</update-dir>
  </dgraph>

  <dgraph id="DgraphB1" host-id="LiveMDEXHostB" port="@@DGRAPH_1_PORT@@"
  post-startup-script="LiveDgraphPostStartup">
  <properties>
  <property name="restartGroup" value="1" />
  <property name="DgraphContentGroup" value="Live" />
  </properties>
  <log-dir>./logs/dgraphs/DgraphB1</log-dir>
  <input-dir>./data/dgraphs/DgraphB1/dgraph_input</input-dir>
  <update-dir>./data/dgraphs/DgraphB1/dgraph_input/updates</update-dir>
  </dgraph>

  <dgraph id="DgraphB2" host-id="LiveMDEXHostB" port="@@DGRAPH_2_PORT@@"
  post-startup-script="LiveDgraphPostStartup">
  <properties>
  <property name="restartGroup" value="2" />
  <property name="DgraphContentGroup" value="Live" />
  </properties>
  <log-dir>./logs/dgraphs/DgraphB2</log-dir>
  <input-dir>./data/dgraphs/DgraphB2/dgraph_input</input-dir>
  <update-dir>./data/dgraphs/DgraphB2/dgraph_input/updates</update-dir>
  </dgraph>

When we are defining here like this we will be getting below in the Experience Manager>EAC Admin Console.


We can start /stop using this EAC admin Console.


Tuesday 22 December 2015

ENDECA APPLICATION DEPLOYMENT


Steps for Creating the Endeca Application . 

Open command prompt
Navigate to C:\Endeca\ToolsAndFrameworks\3.1.2\deployment_template\bin in the command prompt
Run the command:- deploy.bat –app "C:\ATG\ATG11.1\CommerceReferenceStore\Store\Storefront\deploy\deploy.xml"
in the code base
Press enter to continue with these settings

Continue?

Response: Y

*Use N if your ENDECA_ROOT is incorrect, and manually key in the correct ENDECA_ROOT, or type Q, change the environment variable value and restart the deployment template.

Install base deployment? [Y/N]

Response: N

Application name

Response: ATGen

 *Enter a short name for your application[default: CRS]  
 *Choosing a different application name may require additional configuration on
   your web application.

Deployment directory

Response: <Path to your Endeca apps directory, eg: C:\Endeca\apps>

*Do not give the Endeca application name as part of the deployment directory.

 EAC port

[default: 8888]  *Please enter to choose default

Response: 8888

Enter the port where workbench is running. [Default: 8006]

Response : 8006

Enter the port to use for Dgraph1. [Default: 15000]

Response : 15000

Enter the port to use for AuthoringDgraph. [Default: 15002]

Response : 15002

 Enter the port to use for LogServer. [Default: 15010]

Response : 15010

CAS Installed Directory:

Please enter the CAS install directory using Unix-style forward slashes, including the version number (e.g. C:/Endeca/CAS/11.1.0).

Response : C:\Endeca\CAS\11.1.0

Please enter the version for CAS jar files (or hit 'enter' to use the default).  [Default: 11.1.0]

Response :11.1.0

Please enter the hostname where CAS is running (or hit 'enter' to use the default). [Default: localhost]

Response :localhost

Please enter the port where CAS is running (or hit 'enter' to use the default). [Default: 8500]

Response : 8500

Please enter the language code to use (or hit 'enter' to use the default).  [Default: en]
Response : en

Please enter the fully-qualified Workbench hostname, including domain.

Response : localhost

Please enter the production application server hostname. [Default: localhost]

Response : localhost

Please enter the production application server port number. [Default: 7003]

Response : 7003

Please enter the preview hostname. [Default: localhost]

Response : localhost

Please enter the preview port number. [Default: 7003]

Response : 7003

Please enter the context root of the preview application. [Default: /]

Response : /

Specify the path for the Oracle Wallet jps-config.xml file.

Response : C:\Endeca\ToolsAndFrameworks\11.1.0\server\workspace\credential_store\jps-config.xml

Which directory will application configuration archives be exported to.

 Response : C:\Endeca\Apps\ATGen\data\workbench\application_export_archive


Basics of EAC Application


About Record Store and Record Generations

A set of records that has been committed to a Record Store instance is a record generation.
For example, if you perform a full file system crawl, all the records returned from the crawl are written to the
Record Store and a commit is done. After the commit is done, the Record Store has one generation of records.
A subsequent crawl, either full or incremental, results in a second generation of records.
Each record that is read in contains a unique ID. CAS uses that unique ID as the value of the idPropertyName
Record Store configuration property.
If a record already exists with that unique ID during later CAS crawls, then the later version replaces the earlier
one. This ensures that when you run an incremental crawl, you always get the latest version of any given
record.
A record generation is removed from a Record Store instance by the clean task after the generation becomes
stale. A stale generation is a generation that has been in a Record Store instance for a period of time that
exceeds the value of the generationRetentionTime Record Store configuration property.

Command for creating the RecordStore
C:\Endeca\CAS\11.1.0\bin\cas-cmd.bat createDimensionValueIdManager -h localhost -p 8500 -m ATGen-dimension-value-id-manager

with the CAS we can do the following tasks
C:\Endeca\CAS\<version>\bin>cas-cmd.bat --help
usage: cas-cmd <task-name> [options]
[Inspecting Installed Modules]
 getAllModuleSpecs
 getModuleSpec
 listModules
[Managing Crawls]
 createCrawls
 deleteCrawl
 getAllCrawls
 getCrawl
 getCrawlIncrementalSupport
 listCrawls
 startCrawl
 stopCrawl
 updateCrawls
[Managing Dimension Value Ids]
 createDimensionValueIdManager
 deleteDimensionValueIdManager
 exportDimensionValueIdMappings
 generateDimensionValueId
 getDimensionValueId
 importDimensionValueIdMappings
[Viewing Crawl Status and Results]
 getAllCrawlMetrics
 getCrawlMetrics
  getCrawlStatus

About index_config_cmd.bat
  During baseline update processing, the Content Acquisition System merges and processes index configuration
from all owners into a consolidated set of MDEX-compatible output files.
If multiple import owners modify the same attribute, the configuration from the system owner always overrides
other import owners during the merge process.

The Index Configuration Command-line Utility writes and reads index configuration as JSON. The schema for
the JSON file varies depending on whether you retrieve configuration for one owner or more than one owner
and whether you restrict the types of configuration that you retrieve.
Types of configuration include:
• Endeca properties, derived properties, and dimensions. These are specified under the attributes node.
• Precedence rules. These are specified under the precedenceRules node.
• Search configuration. These are specified under the searchIndexConfig node.


CAS-based data processing
The Deployment Template supports running baseline and partial updates using CAS as a replacement for
Forge. In this processing model, the update runs a CAS crawl to produce MDEX-compatible output. This is
the step that removes the need for Forge. Then the update runs Dgidx and updates the Dgraphs in an application.
Dgraph baseline update script using CAS
You do not need to run Forge if you run a CAS crawl that is configured to produce MDEX-compatible output
as part of your update process.
This example runs a baseline update that includes a full CAS crawl. The crawl writes MDEX compatible output
and then the update invokes Dgidx to process the records, dimensions, and index configuration produced by
the crawl. To create this sequential workflow of CAS crawl and then baseline update, you add a call to run¬
BaselineCasCrawl() to run the CAS crawl.

Initial setup.xml
Importing dimension value Id mappings
The importDimensionValueIdMappings task imports dimension value Id mappings from a CSV file into
a Dimension Value Id Manager. The restore process completely replaces all dimension value Id mappings
stored in the Dimension Value Id Manager.
The syntax for this task is:
cas-cmd importDimensionValueIdMappings [-h HostName] [-l true|false] -m dvalmgr
[-p PortNumber] -f mappings.csv

DataIngest.xml
 Specifies data processing scripts, including the baseline update script, partial update
script, and the components to perform data processing such as CAS or Forge and Dgidx.

The Record_spec.xml 
This file contains a RECORD_SPEC element that specifies a property to identify records during partial updates.
When implementing partial updates, the RECORD_SPEC element uses this property to preserve stable record IDs across baseline runs. That is, a record will have the same ID in the next update as in the current update. For more information, see the Endeca MDEX Engine Partial Updates Guide.